Mirage Callouts in CS2: Complete Map Guide & Locations
Many would argue that Mirage is the undisputed king of modern matchmaking. If you queue for a game, there’s a high chance you’ll end up among the sandy palaces and narrow streets of this location. But popularity doesn’t mean it’s easy to play here. Often, the difference between victory and defeat isn’t about aim accuracy, but a single, timely phrase.
Picture this: you’re in a 1v1 clutch, heart pounding, and a teammate screams into the mic: “He’s there, behind the box!” You look at one box, and the enemy peeks from another. Round lost. To prevent this, in this guide, we’ll break down all the Mirage callouts in detail so you can coordinate like a true pro player and turn the chaos of random queuing into a clean victory.

In article you will find:
Overview of Mirage (Map Background & Layout)
Before diving into details, it’s worth understanding what we’re dealing with, as not everyone has been playing the game for 5 or 10 years, and many will be interested to learn more about this map. Mirage was created by Michael “BubkeZ” Hüllmann back for the CPL esports league in 2004, and since then, it has become an integral part of Counter-Strike. Although the map wasn’t as popular in early versions, other maps dominated back then, it gained its fame during the release of CS:GO.
Visually, the map resembles a Middle Eastern or Moroccan style, similar to Dust 2, but with cleaner and more “rectangular” architecture. In CS2, the developers refreshed the textures, adding more golden reflections and details (for example, the carpets at Site A became more detailed), but fortunately, they left the geometry almost untouched.
Structurally, it is a classic “three-lane” map:
- A Site: An open space where smokes and fast executes decide everything.
- B Site: A closed fortress where fast rushes through Apartments often occur.
- Mid: The key control zone. Unlike many other maps, map control on Mirage relies critically on holding the center for rotations through “Connector” or “Short”.
Precisely because of the center’s importance, this map demands perfect communication. Knowing the correct Mirage map callouts here is vital, as the enemy can appear from any side in a matter of seconds.
How to Use Callouts — Best Practices
If you’ve played Mirage, you know events unfold instantly here. A second’s delay in info turns an easy kill into a lost round. Long descriptions don’t work here. Your communication needs to be short and deadly accurate, like a shot!
There’s actually an unwritten rule about how info should be given, so forget phrases like “I think someone was near Connector and I think there were a few, but I’m not sure.” Speak in facts: “Two Connector, pushing A.” This is one of the best options – why, you ask?
Because it’s short and precise, allowing teammates to clearly understand the info without any fluff. Ideally, info should sound something like: “Location + Number of Enemies + HP Status.” For example: “Connector, 2, one low.” This info triggers a chain reaction: your anchor on A preps a flash or utility to stop the attack, and the sniper in Window changes angles.
This synchronization allows the team to Rank up fast and feel confident in the hardcore CS2 ranking system. Remember: on this map, the winner isn’t the one who shoots better, but the one who shares information faster.
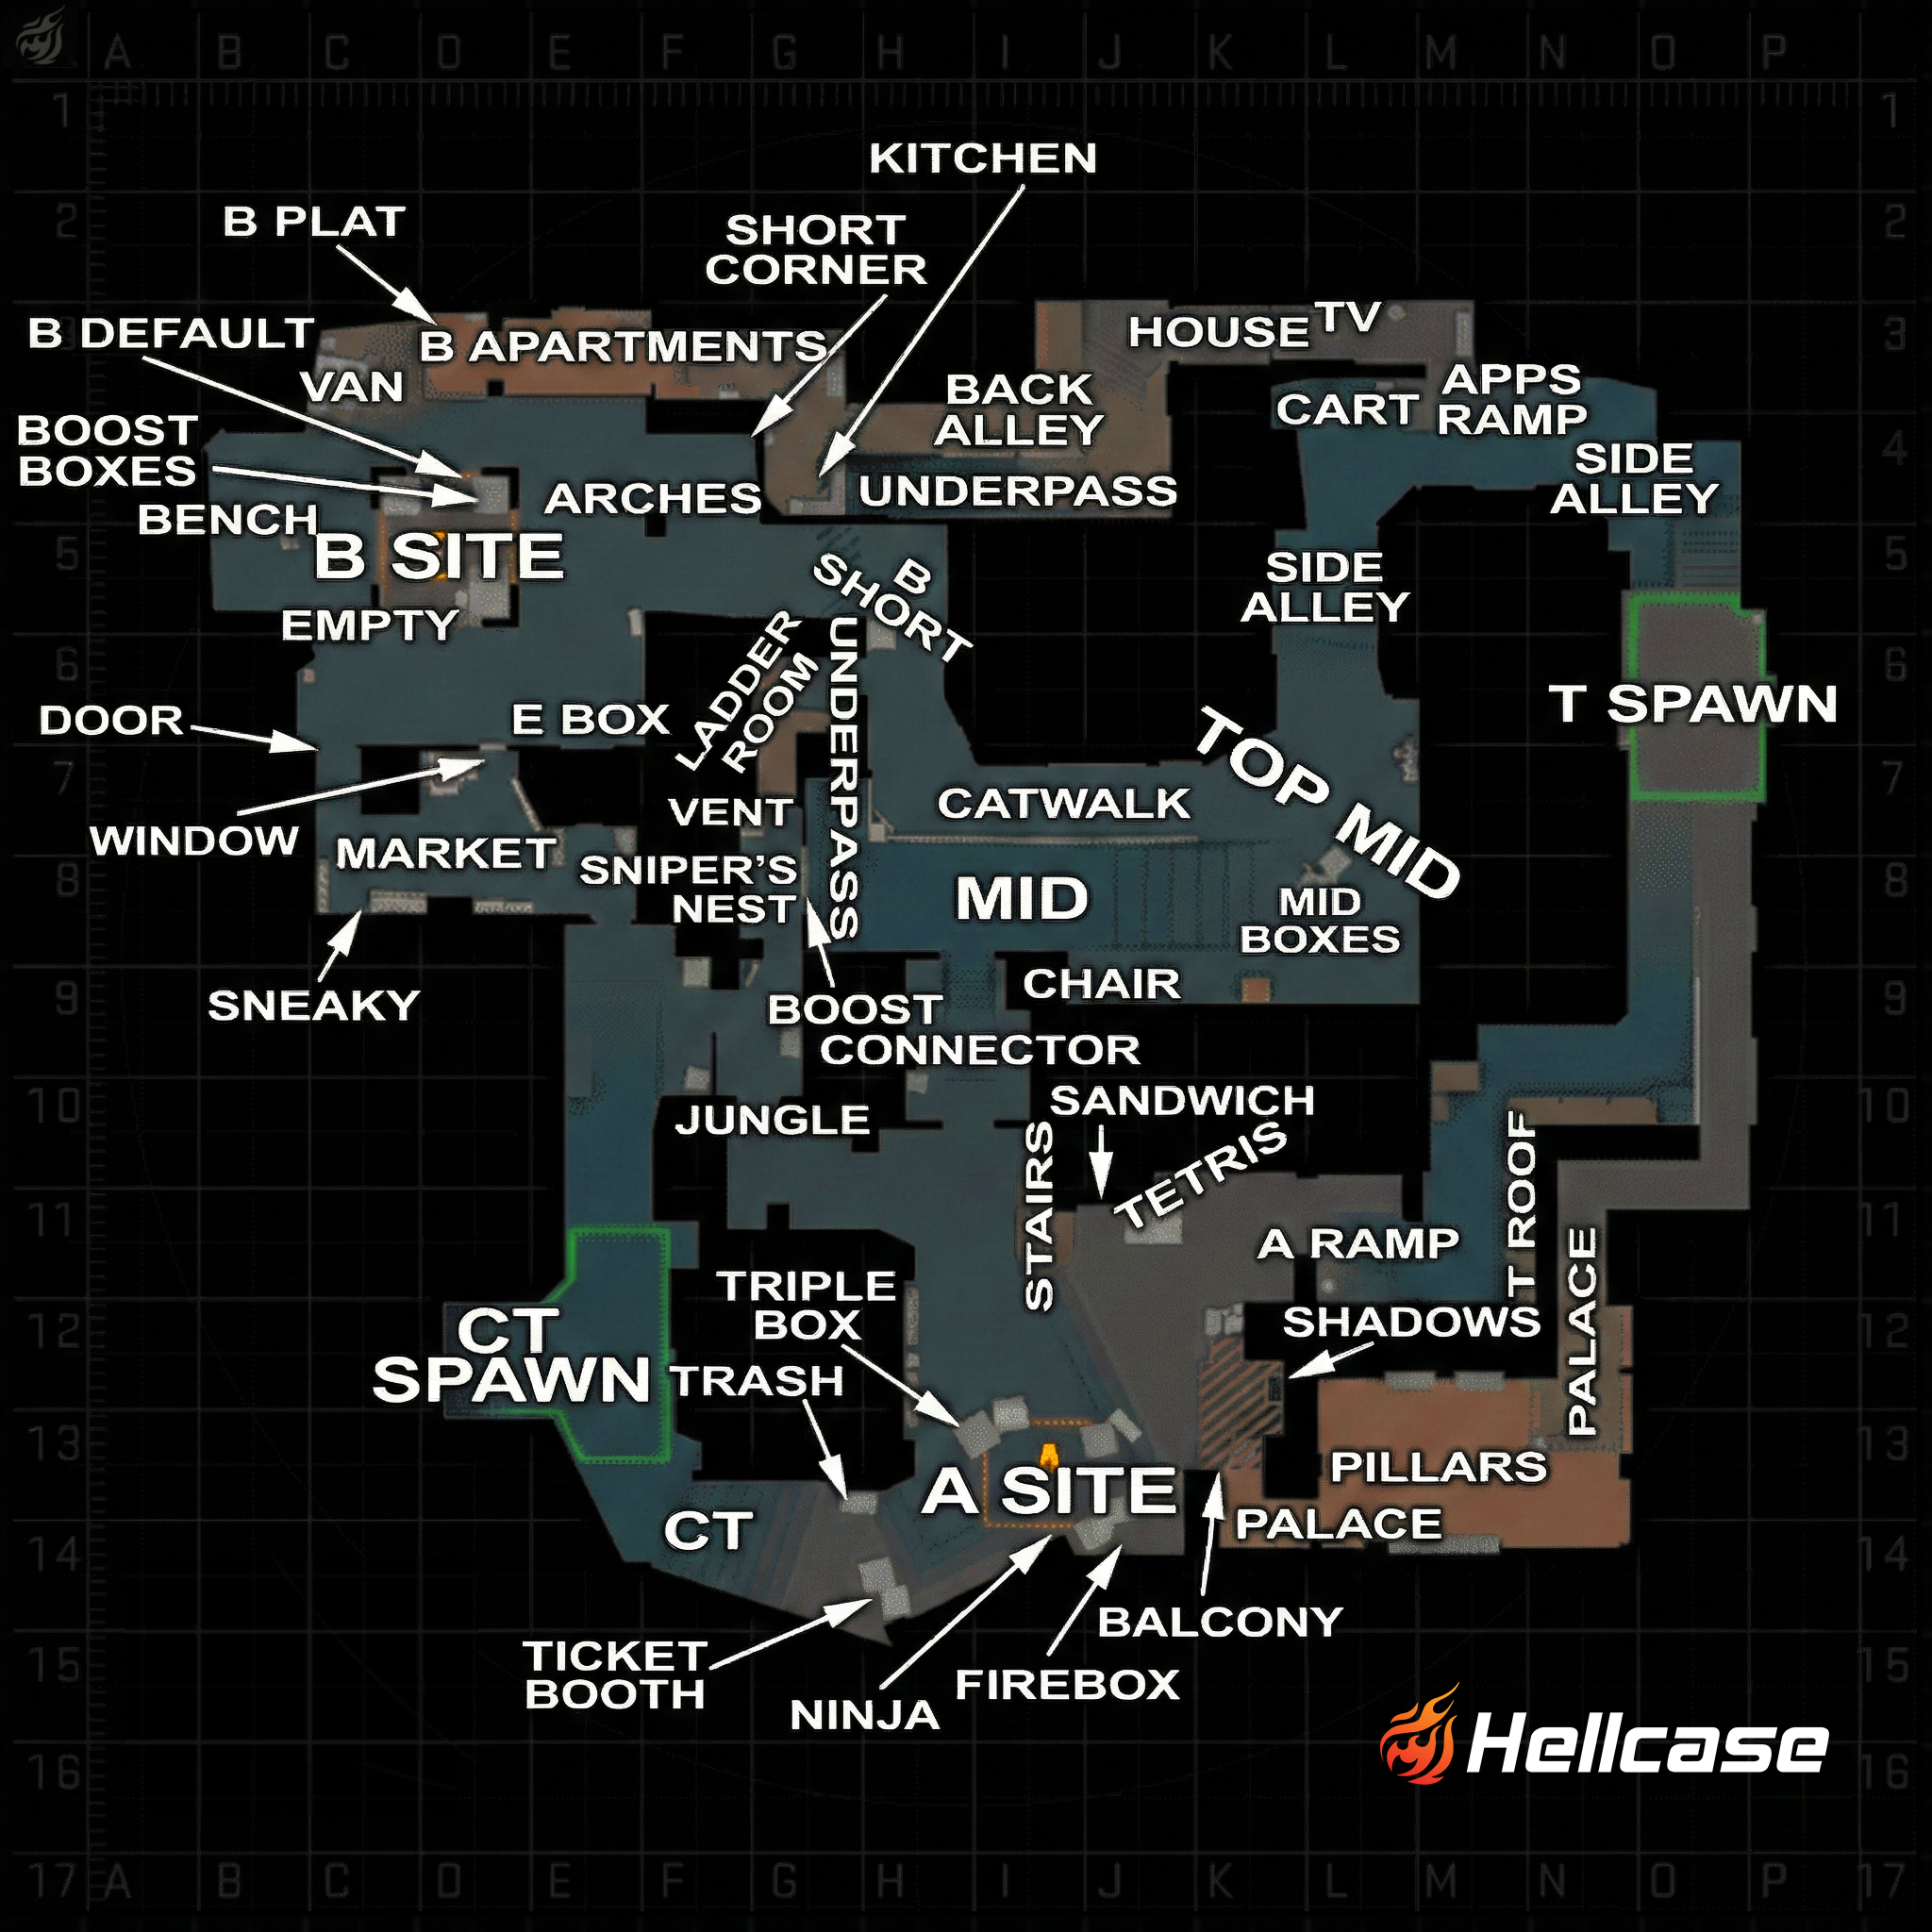
Mirage Callouts by Region
To break down this map, we don’t need to reinvent the wheel, but we must clearly understand zones of responsibility. Mirage is unique because there are almost no “dead zones” – every meter has a name. We’ll go through the three main places (zones) on the map: A Plant (Site), B Plant (Site), and the all-important Mid.
Callouts for Mirage A Site
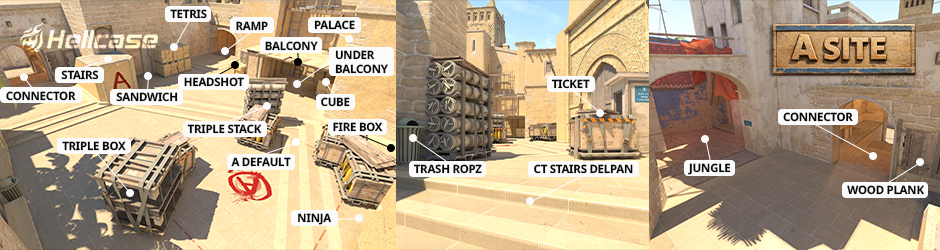
This is arguably the most famous spot in Counter-Strike history. This is where the legendary “A-execute” with three smokes happens, which every self-respecting player knows. But when the smoke clears, the chaos of close-quarters combat begins.
Here is the full list of Mirage callouts for this zone:
- Palace: A large building with pillars. The main entrance for the attack, convenient for waiting out defense mistakes.
- Balcony: The narrow exit from Palace. This is a “kill zone”: jumping from here without a flash is suicide.
- Dark (Under Palace): The dark corner right under the balcony. A favorite spot for shotgun camping or unexpected backstabs when the enemy has already entered the site.
- Ramp (A Ramp): The main incline from T-Spawn. Attacking snipers often hold angles here.
- Tetris: Concrete blocks and boxes in front of Ramp. Perfect cover for attackers to get up close to the site.
- Sandwich: The trap between Tetris and Stairs. Players often hide here to let enemies pass and then strike from behind.
- Stairs: Stone steps. A strategic point: from here you control both Palace and the exit from Connector.
- Connector (Con): A tunnel with stairs connecting Mid and A. This is a key part of A-Site: if you lose Connector, the site defense falls apart.
- Jungle: The area connecting Connector and Window. Allows the defense to react instantly to threats from both sides.
- Firebox: The corner behind the boxes on the site itself. The name speaks for itself – Molotovs always land here.
- Ninja: A hidden position to the left of Firebox (if looking from Ramp). It’s a “blind spot” for attackers that they often forget to check, allowing for an easy multi-kill or defusing the bomb in smoke.
- Triple (Triple Box): A high stack of boxes in the center of the site. The main outpost of the defense.
- Ticket (CT Spawn): The position near the booth that looks like a ticket counter. A favorite spot for CT snipers.
Well, let’s move on to the tighter space on the map, specifically B Site!
Callouts for Mirage B Site
Unlike A, the B point is a closed fortress. Here, the attack often explodes with an instant rush through Apartments, so the defense must react with lightning speed. This is a zone of close contact and clutches.
Here are the main CS2 Mirage callouts for this part of the map:
- Apartments (Apps): A long corridor through which terrorists exit onto the site. This is the main “highway of death” for the attack.
- Van (Car): The van near the Apartments exit. This is a key position: from here you can jump into Apartments or just control the exit by hiding behind the wheels.
- Bench (Jail): The bench in the corner of the site. Often this place is called “Jail” because of the bars on the wall, or “Forest”. An ideal place for a defender to remain unnoticed.
- E-Box: The electrical box in the corner of the site (opposite Apartments). A very popular position for an anchor.
- Market (Kitchen/Shop): A store with a register through which CTs rotate from CT-Spawn.
- Window (Market Window): The window from the store onto the site. A perfect spot for a sniper or for retaking the site.
- Empty (Pillar): The empty space around the large pillar on the site.
- Default: The standard bomb plant spot (usually in front of the boxes), so it’s visible from Apartments.
- Door (Market Door): The door from the store. An alternative exit for the defense.
These are the main positions you should know. Although B Site has many more spots that clarify enemy locations, like Safe, Bin, and Sneaky, you’ll encounter those later in the game. Our list will be enough for you to play well and win on Mirage!
But victory on this map depends heavily on controlling the center, so let’s move on to the map’s main artery.
Mirage Mid Callouts
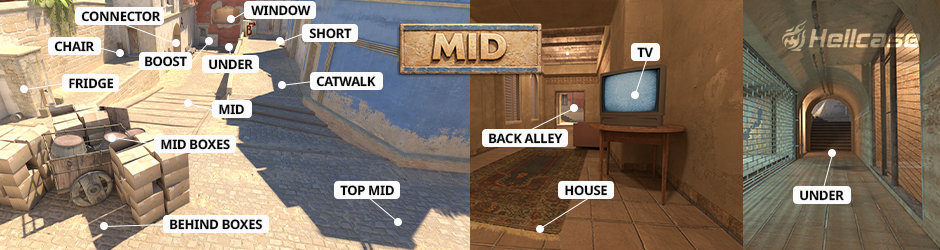
As we said above, Mid on Mirage isn’t just a passageway; it’s a chessboard. Whoever controls Mid controls the map, having access to both sites (via Short to B or Connector to A). This is the zone of highest tension, and this is where you’ll find the most critical CS2 Mirage callouts to learn.
Here are the main positions for Mid:
- Window: The window in the wall on the CT side. This is the “throne” for the defense sniper. From here, all of Mid is visible, and this is exactly where the first smoke from terrorists flies.
- Jungle: Although it’s part of A-Site, from here players often cover Window, spamming through to Mid.
- Connector: The tunnel leading from lower Mid to point A. A critical position for rotations and map control.
- Top Mid: The upper part of the center where terrorists exit from their base. The first duel with the sniper in Window usually happens here, though people usually refer to the entire upper area this way.
- Catwalk: The long bridge/parapet running from Top Mid to the left toward B Site.
- Short (B Short): The end part of “Catwalk,” the turn right before entering B. A clash often happens here between the attack and the B anchor.
- Chair (Delpan): The corner with a chair in Mid (to the right of Top Mid, near the Connector entrance). A legendary position named after the player Delpan. From here, terrorists often hold Window, push Connector, or watch Zigzag (Short).
- Start: The top part of Mid, but when people say “Start,” they mean specifically the left side where terrorists peek Mid. In this zone, the T-side sniper often tries to outplay the sniper in Window.
- Mid Boxes: If you know for sure the opponent hasn’t advanced further to Chair and has already passed Start, you can safely say the opponent is at Top Mid behind the boxes.
- Cart: The corner in lower Mid, to the right of the Connector entrance. In CS2, there’s a bench here now, but players call this place “Cart” out of old habit to avoid confusing it with the “Bench” position on B-Site, or they clarify by saying “Mid-Bench.”
- Under Window (Underpass): The underground passage connecting Apartments B and Mid. Allows you to pass unnoticed under the sniper’s window. Often you might just hear a short shout of “Under” from teammates.
Although we’ve sorted out the key positions, there are a few more places on the map you need to know to be maximally effective when playing Mirage.
Other Important Mirage Callouts
Besides the hot spots on the sites and Mid, there are zones you pass at the start of every round or use to save weapons. Knowing these Mirage callouts CS2 will help you coordinate rotations better.
- T Spawn: Terrorist base. A large open zone. If you hear “Save T Spawn,” it means enemies are likely hiding there to save an AWP for the next round.
- T Roof (Ledge): The ledge before the entrance to Apartments from the T base side. Key smokes for Window or Short are thrown from here.
- Trash (Trash Can): The trash can near the entrance to “House” (TV Room). Used for boosting or a tricky jump onto the Apartments balcony.
- Back Alley: The alley leading from T-Spawn to Apartments B.
- TV Room (House): The room with a TV inside the building before Apartments. The attack often gathers here before a fast exit onto B.
- Side Alley: The passage from T-Spawn toward A-Site (to the Palace entrance).
Callout Usage in Game Scenarios
Knowing the names of spots is just theory. True mastery begins when you combine them into clear, short commands. Let’s look at concrete examples where correct Mirage callouts save rounds.
Imagine you’re attacking A Site, running up Ramp, getting onto Tetris, but two of your teammates died during the attack, and you didn’t even notice where from. Looking at A Site, there are tons of boxes an enemy could be hiding behind. If your teammate gives you exact info like “Ninja” or, for example, “Firebox,” you’ll know exactly where to look and have a higher chance of winning the round.
Or another situation: you were defending A Site, but the terrorists broke through B. By the time you rotated, the main fight was over, and you’re left 1v1 against an opponent. Where is he? What to do? If your teammate gives you timely info about his location, it helps immensely. Especially if they tell you the last one is “Low HP” – this gives you not only confidence but also the chance to kill the opponent with a grenade without risking a headshot from an AK and losing the round.
Common Mistakes, Ambiguous Callouts & Conflicts
Even on a map as studied as Mirage, misunderstandings happen. Here are the most common mistakes that can cost you a round:
- Kitchen (Market) vs Kitchen (T-Apps): This is a classic. There are two “Kitchens” on the map. One is the room with the register near B-Site (more often called Market), the other is the tiled room before the exit to Apartments on the Terrorist side. Always clarify: “Market” for the CT zone and “T-Kitchen” or “Apps” for the T zone.
- Cart (Mid) vs Bench (B): As we already mentioned, there’s a bench on Mid now instead of a cart. If you say “Bench,” a teammate will automatically look at B-Site. So, for the position on Mid, it’s better to use the old name “Cart” or clarify with “Mid Bench.”
- Ticket vs CT: Many use these names as synonyms. But technically, “Ticket” is specifically the booth players hide behind, and “CT” is the open space around it. If an enemy is “On CT,” they could be anywhere; if they are “Ticket,” you know exactly where to aim.
These are the main points players confuse most often on Mirage, so try to avoid these errors so your allies always understand you clearly.
To Sum Up
Mirage is a map that doesn’t forgive silence. You can have the best aim in the world, but without info on enemy positions, you’ll always be one step behind. Learning the correct names (callouts) is the foundation upon which all tactics in CS2 are built.
Don’t try to memorize every “hiding spot” in one evening. Start with the main zones: Mid, Connector, Jungle, Palace. Over time, these names will become a second language to you. And if you feel the sands of Mirage have bored you and you want new challenges, be sure to check out our guide on Anubis callouts to dominate just as confidently on the newest map in the competitive pool.
Remember: the winner isn’t the one who shouts the loudest, but the one who gives clear information.
FAQ
Most callouts haven’t changed since the map’s layout is identical. The main differences are purely visual. For instance, the “Cart” on Mid is now a bench, but players still stick to the old callout.
For the most part, yes – English callouts are the international standard. However, you will find regional variations (for example, in Eastern Europe, “Firebox” is sometimes called “Default” or “Ninja,” which can get confusing), so it is best to stick to the standard English terminology.
Valve hasn’t officially named a specific city, but the architecture with its arches, mosaics, and rugs strongly points to Morocco or a general Middle Eastern aesthetic.
Historically, Mirage has been considered one of the most balanced maps in the game, though CTs have usually held a slight edge due to their control over Mid (specifically Window and Connector). However, in CS2, thanks to the new economy and peeker’s advantage, the T-side now has a much more even playing field.
Average CS enjoyer. Knows everything about CS skins, including which ones will suit your weapons best.