Complete Guide to CS2 Anubis Callouts: Master Every Map Location
In Counter-Strike 2 (CS2), strategy is everything—but strategy means nothing if you don’t know the map like the back of your hand. That’s especially true for Anubis, one of the most complex and visually unique battlegrounds in CS2. To dominate this map, you must memorize every chokepoint, rotation path, and hidden angle. Without a strong understanding of Anubis callouts, even the best tactics can fall apart.
In this guide, we’ll cover all forty Anubis map callouts to help you communicate efficiently with your team and build winning strategies. From narrow passageways to high-risk entry points, mastering these Anubis callouts CS2 players rely on can turn a frustrating match into a coordinated victory.

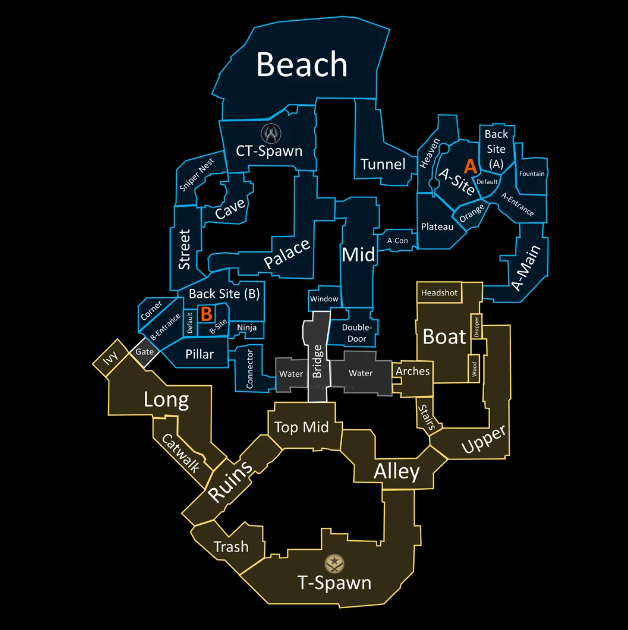
Before we dive into the details, take a moment to glance at the complete Anubis map. This overview will serve as your visual guide as we explore each callout location step by step.
In article you will find:
T Spawn and Initial Movements
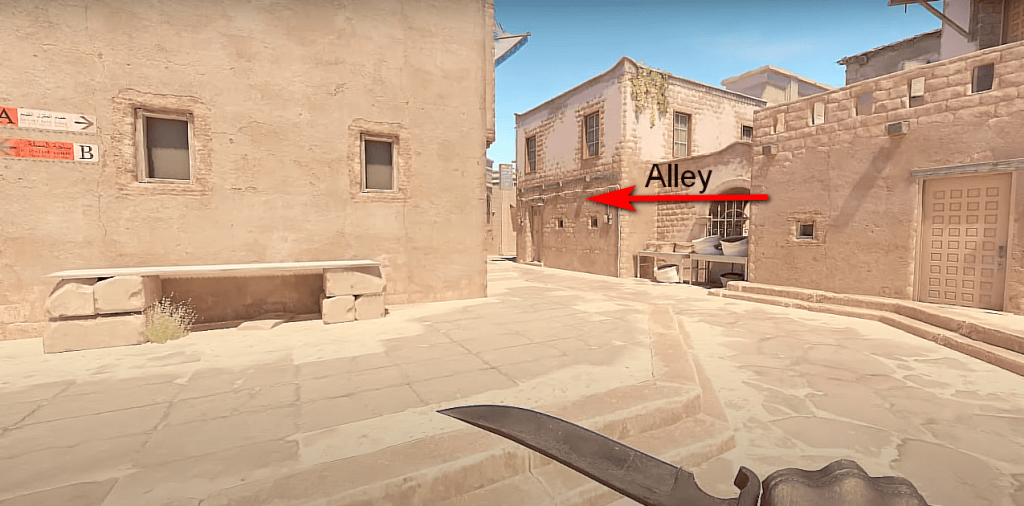
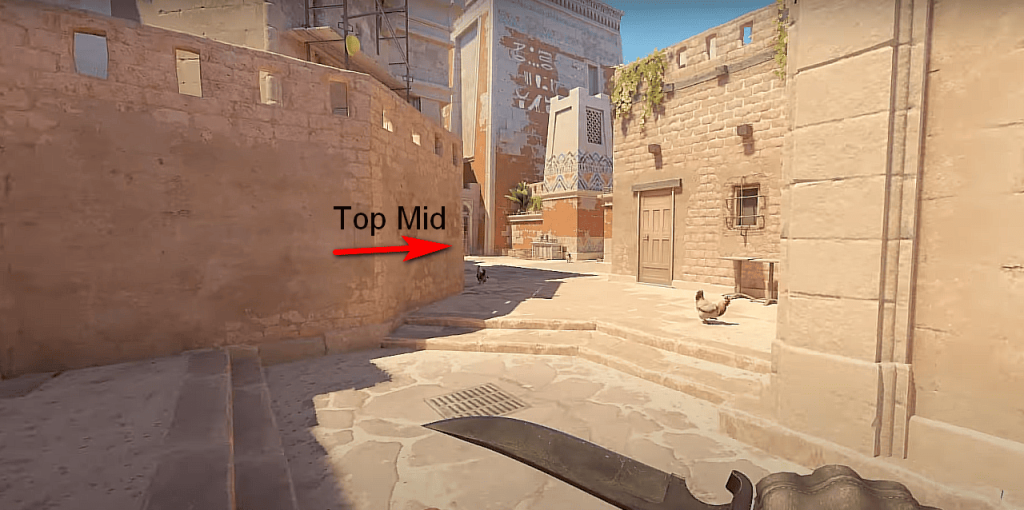
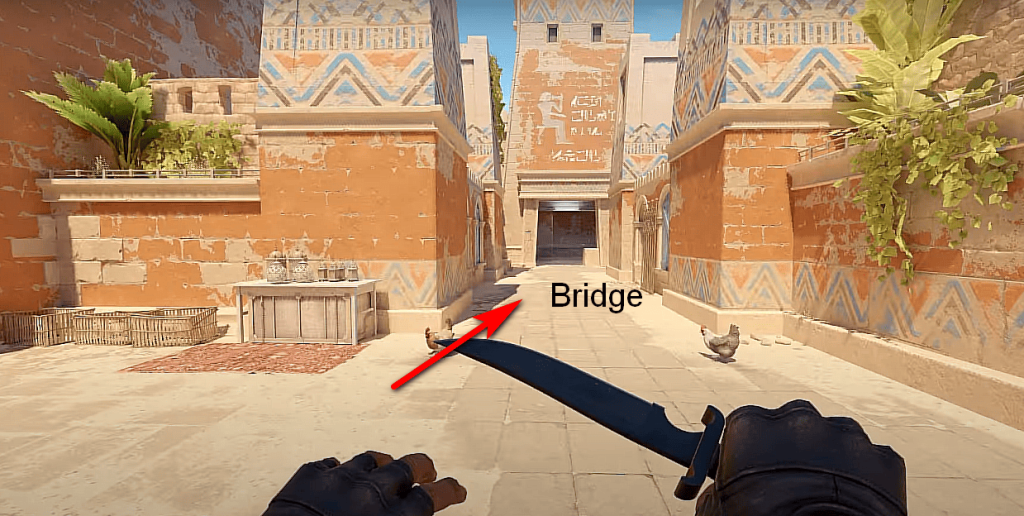
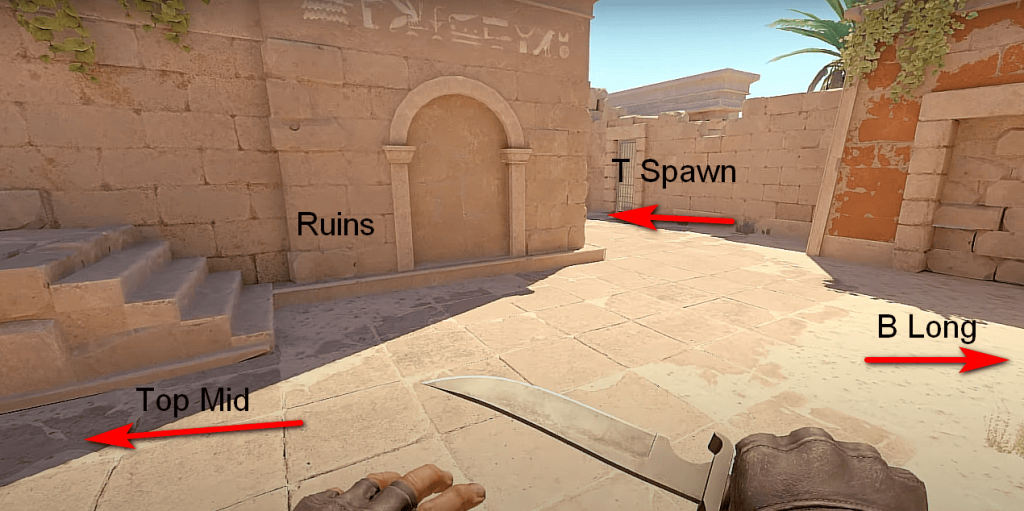
When playing as the Terrorists on Anubis, your round begins at T Spawn—the heart of your early-game decision-making. From this starting point, you have two primary options: head right toward Alley and the A bombsite or move left through Ruins en route to the B site. Both of these paths converge at Top Mid, which serves as a crucial access point to Bridge and allows for dynamic rotations.
These early movement choices are essential for building an effective opening strategy and outsmarting the Counter-Terrorists. Understanding the CS2 Anubis callouts players rely on in this area will significantly enhance your coordination and timing.
Here are the key Anubis map callouts for this part of the map:
- T Spawn: The default starting position for the Terrorist team.
- Alley: Located immediately to the right of T Spawn, Alley connects to Top Mid and provides access toward the A site.
- Ruins: Found between T Spawn and B Long, Ruins offers a route toward Top Mid and the B bombsite.
- Top Mid: Positioned above T Spawn, this is a pivotal location for map control and leads directly to Bridge, making it vital for rotations and mid-pressure plays.
Mastering these early-round CS2 Anubis callouts sets the stage for the rest of your match. Whether rushing, faking, or playing defaults, understanding these paths can make all the difference.

A Site and Surroundings
A Site is the main Anubis callout for intense firefights and clutches. Besides, if you want to know how to win clutches, check out our guide.
At the center of A Site stands a large, distinctive pillar that can be used for cover or mind games. Securing A Connector and Heaven gives your team a major tactical edge, letting you control key entry points and defend the site with confidence. That’s why understanding and using the right Anubis callouts CS2 in this area is essential for executing successful strategies.
Below are the important Anubis map callouts for this part of the map:
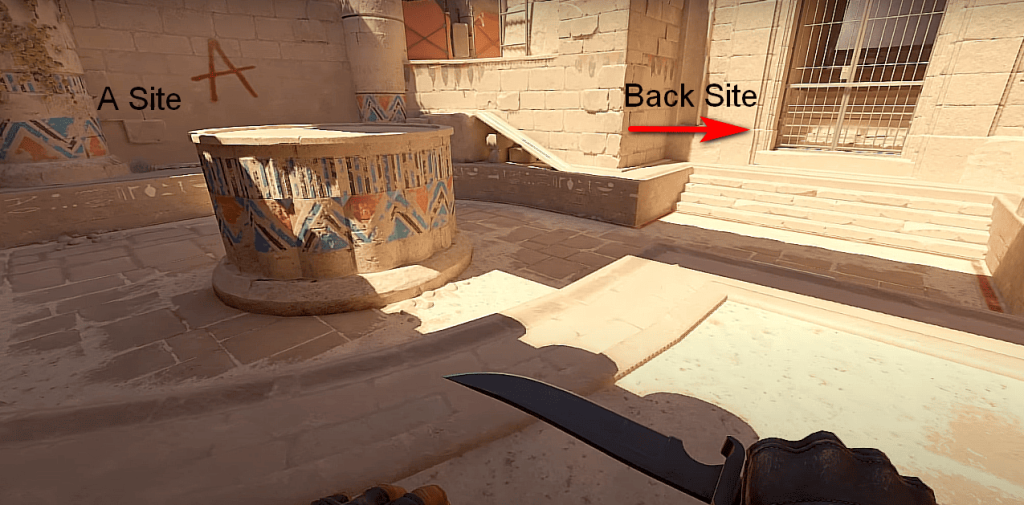
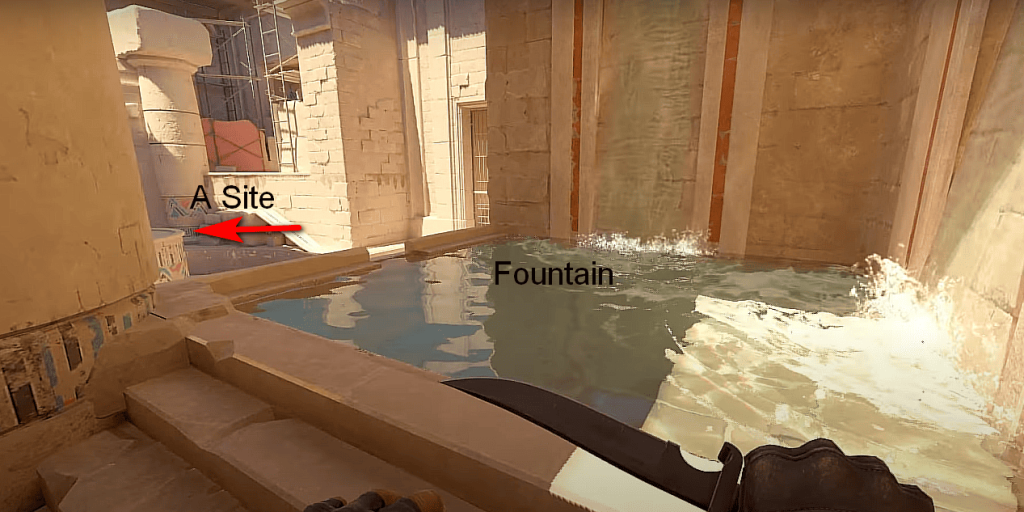
- A Site: The central bomb planting area, featuring a large stone pillar that provides cover and impacts sightlines.
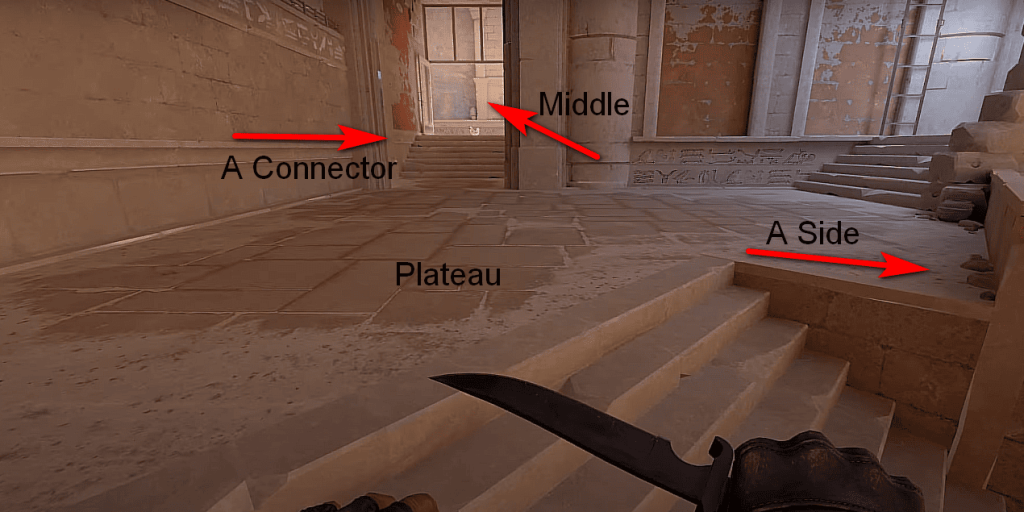
- A Connector: A narrow passage that links Middle to A Site, often used for flanks or fast rotations.
- Back Site (A): Located next to the gated door at A, this is a common position for hiding or defending post-plant.
- Heaven (A): An elevated spot overlooking A Site. From here, players can control the walkway from Main and catch attackers off guard.
- Fountain: Positioned near the central pillar, this spot is easily identifiable thanks to the decorative fountain—often used for crossfire setups.
- Plateau: This transition zone connects A Heaven, A Connector, and A Site, offering valuable vertical positioning and fast access between zones.
Mastering these Anubis callouts allows your team to hold the site more effectively and react to rotations with precision. Whether you’re executing or defending, communication is key.
B Site and Surroundings
B Site is that Anubis callout where you need to use the whole potential of your reaction and an equally fast mouse response. You can find the mouse sensitivity guide.
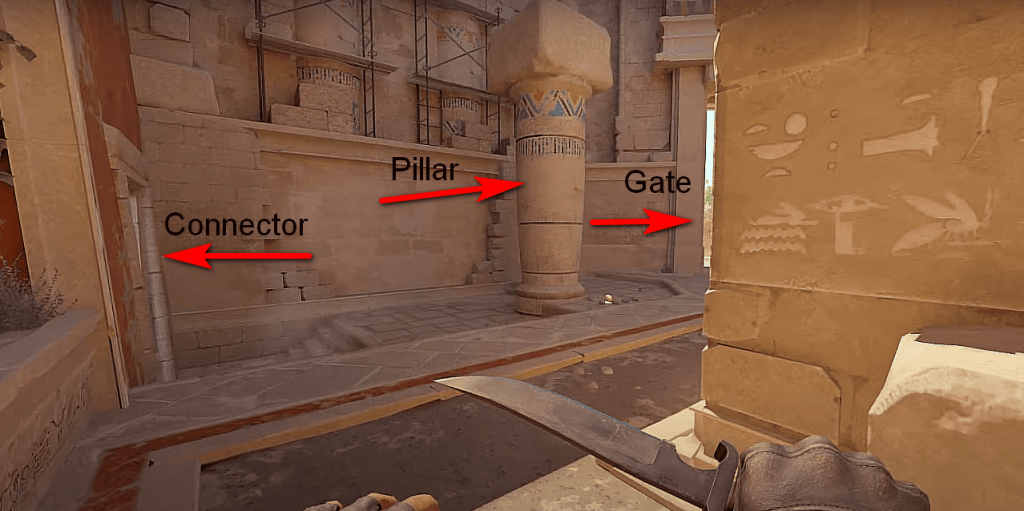
That Anubis area has multiple entry entrances and hiding places (for example, Ninja, Back Site). It would help if you had good coordination and quick reflexes to control that area. Remember to use each pillar and Gate to trick the opponent strategically.
Here are all Anubis map callouts in that location:
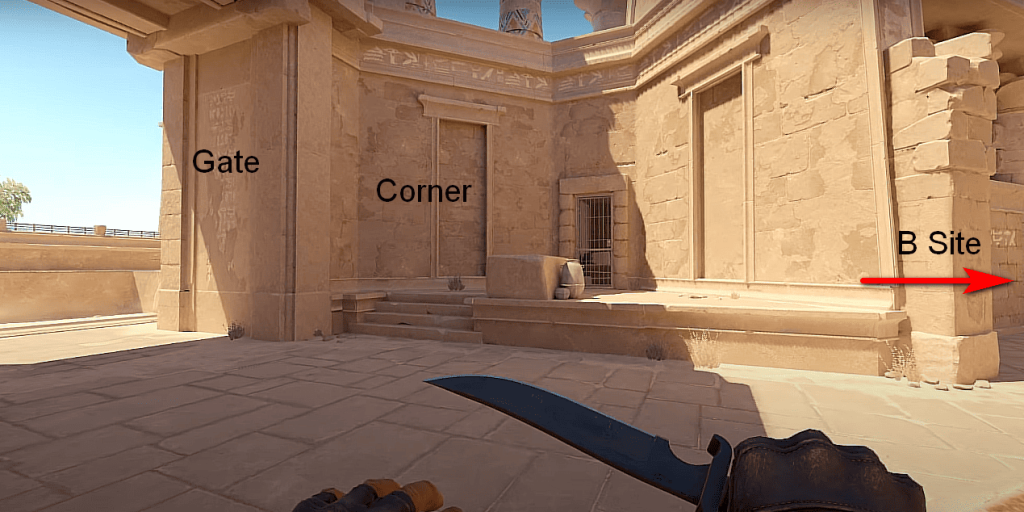
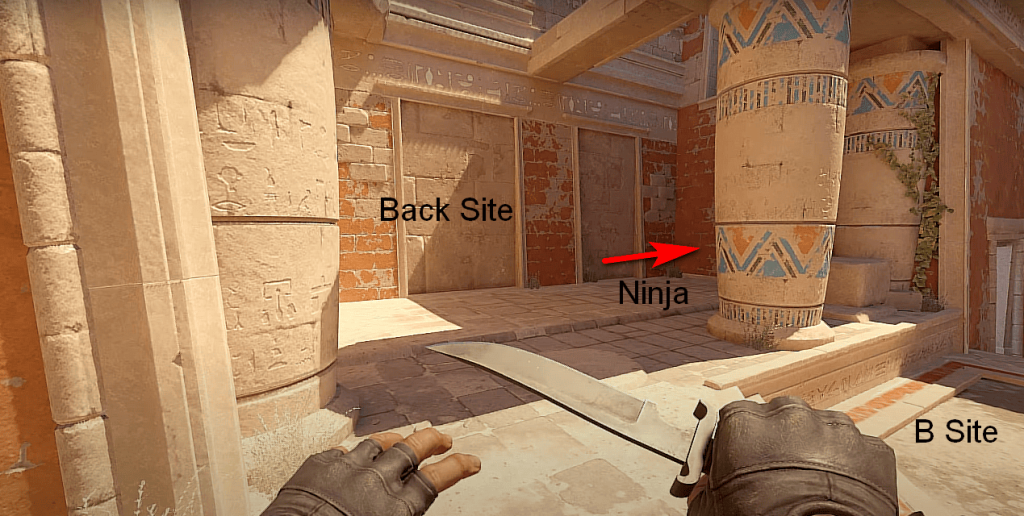
- B Site: The central location of the B Bombsite with small areas like B Pillar, Gate, Corner, Street, Ninja, and Back Site.
- B Long: The location of the entrance to B Bombsite between B Bombsite and Ruins.
- Gate: The archway to enter B bombsite from B Long.
- Pillar (B): The first pillar in the B Bombsite, which you can see when you enter the B Bombsite from the B Long.
- Back Site (B): The far pillar in the B Bombsite, which you can see when you enter the B Bombsite from the B Long. That callout isn’t visible to Gate.
- Ninja: The small hidden area next to Back Site.
- Heaven (B): The elevated location in Ruins. Players have a possibility to control B Long.
- Corner: The triangular location close to the entrance of B Bombsite from Gate.
- Street: The long walkway. Players can use it to enter B Site from CT Spawn.
Key Defensive Spots for CTs
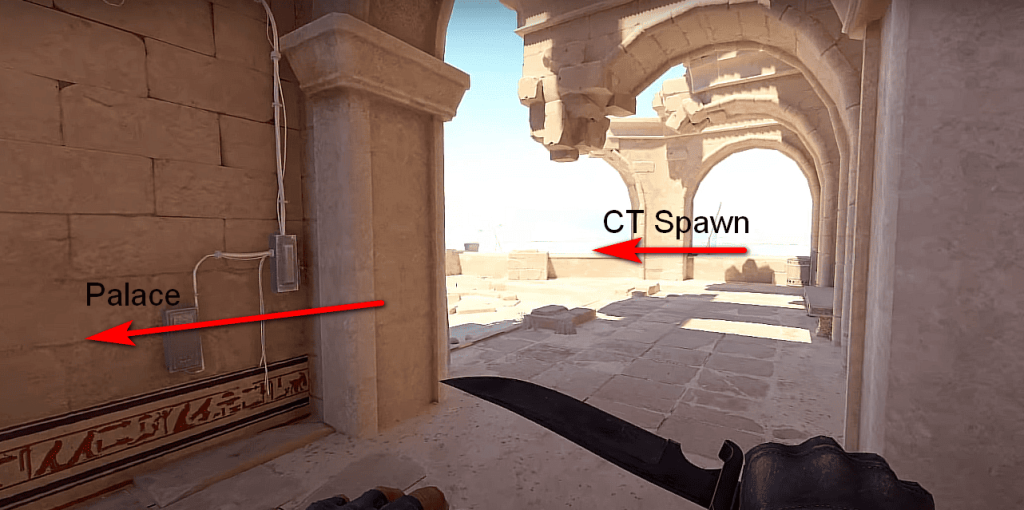
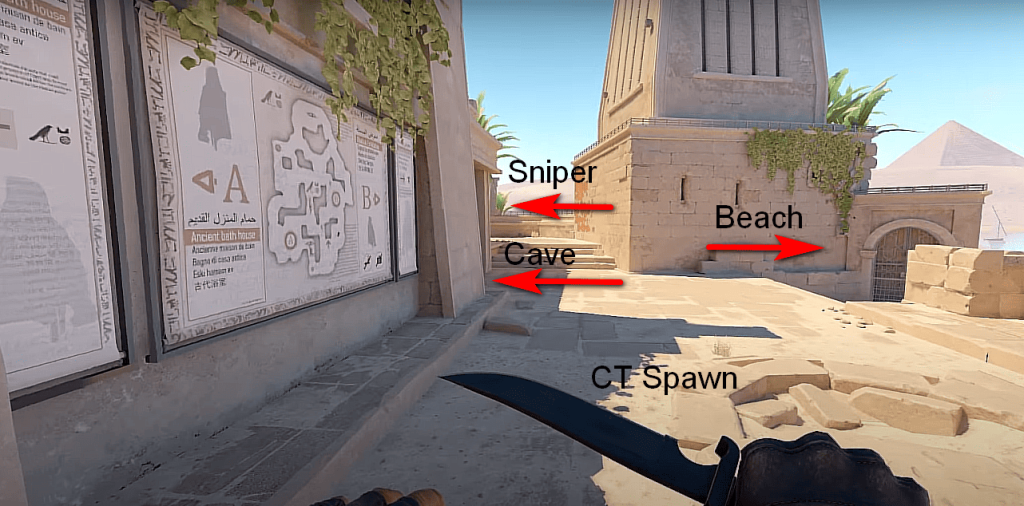
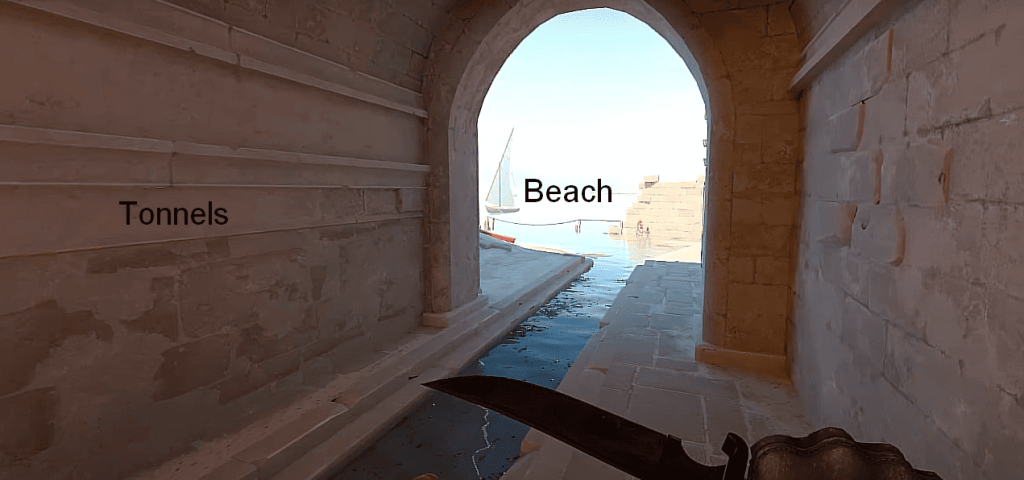
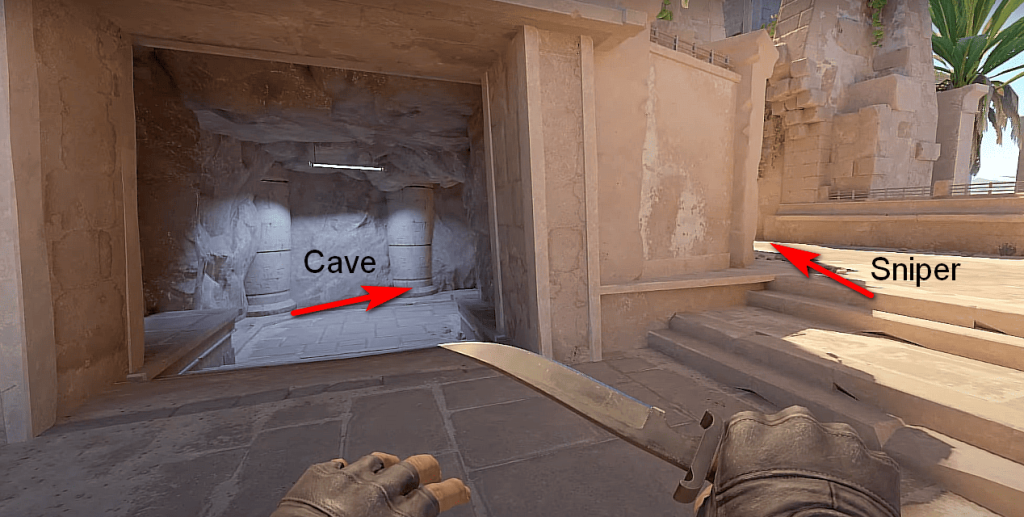
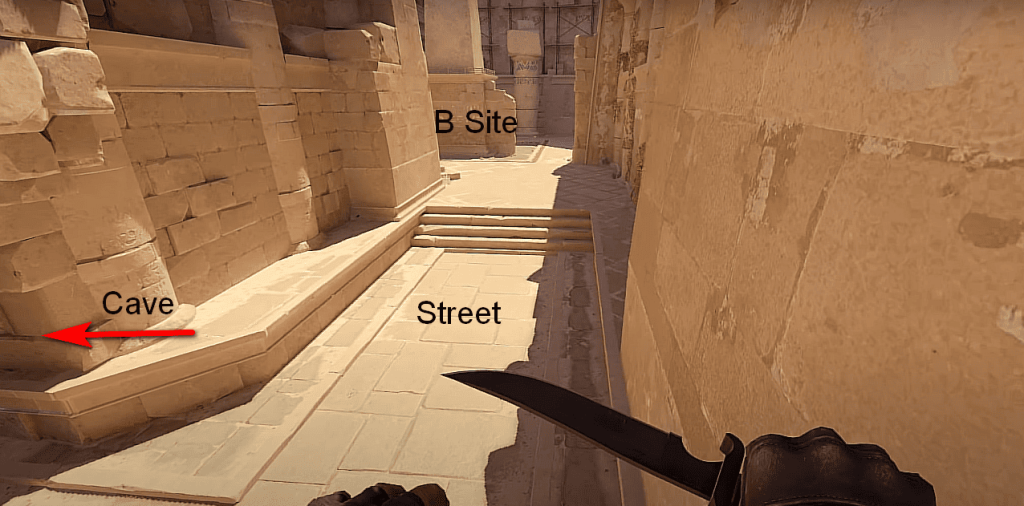
Several CS2 Anubis callouts for the Counter-Terrorist side allow you to control and defend that area successfully. Your round begins at CT Spawn. You have four ways from that Anubis callout: back to Beach in the direction of Tunnel and A Site, left to Palace or Middle, right to Sniper, or straight to Cave in the direction of Street and B Site. Here, you should check your radar to see the opponents and the corners that are good to hide in.
Here is the list with Anubis callouts on that CS2 location:
- CT Spawn: The spawn area for the Counter-Terrorist side at the beginning of each round.
- Sniper: The elevated standing area. It’s suitable for sniping Terrorists crossing to B Site from Gate.
- Cave: The cavernous walkway which connects CT Spawn and Street.
- Street: The long pathway that combines B Side and CT Spawn through Sniper and Cave.
- Palace: The large indoor location with an Egyptian statue, which connects CT Spawn, B Site, and Middle.
- Beach: The prominent sandy location behind CT Spawn. It offers a walkway to A Site.
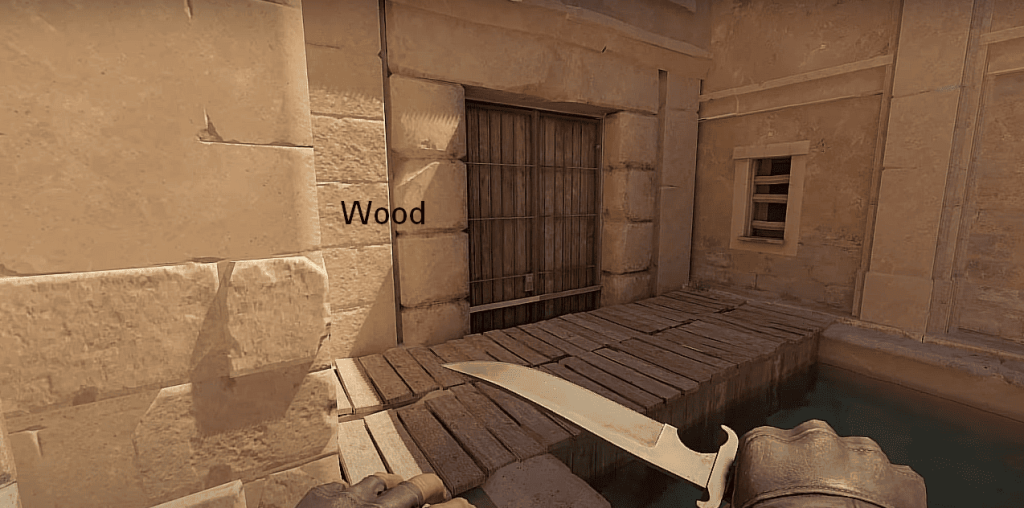
Advanced Anubis Callouts for Strategic Play
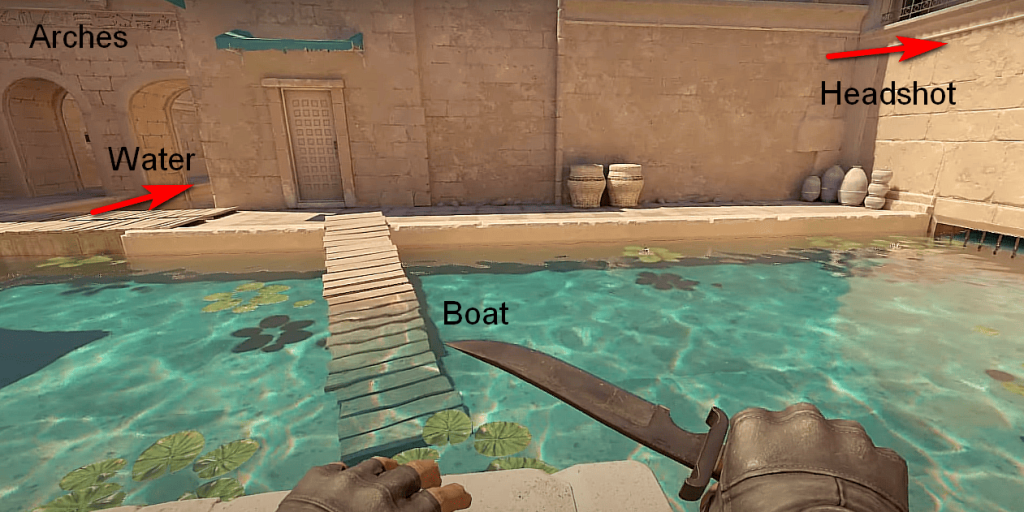
Also, it would help if you used the advanced Anubis callouts for strategic gaming in CS2. For example, you can use Boat Anubis callout to give your teammates clear information about which area you are talking about without confusing it with Water.
Each CS2 player who is able to boost their rank should use these Anubis callouts.
Here is the list of Anubis callouts that could improve your gaming experience:
- Drop: The small walkway that gives the Terrorist the possibility to enter Boat from Upper.
- Boat: The large area that allows Terrorists to enter A Site.
- Wood: The corner on Boat for hiding.
- Headshot: The slight angle that provides hiding behind the boxes to control the walkway between Boat and Main.
To Sum Up
Mastering Anubis callouts is essential for any CS2 player who wants to dominate matches on this unique and complex map. From early movements at T Spawn to high-stakes encounters at A Site, knowing every location and how it connects with the rest of the map gives you a strategic edge.
Clear communication using the correct Anubis callouts CS2 players rely on helps your team rotate efficiently, defend effectively, and execute coordinated attacks. Whether you’re holding angles, rushing sites, or clutching in the final seconds, being fluent in these Anubis map callouts can make the difference between victory and defeat.
Study the callouts, practice with your team, and turn your knowledge into wins. The path to mastering Anubis starts with knowing every corner—and now, you do.
You can also learn about other game guides on the Hellcase Blog. Here, you will find materials about playing CS2, esports news, and top lists with the best skins for each kind of weapon. Stay with us!
El Pollo Diablo is the author of articles and game guides. He knows the answers to all your questions about game mechanics, updates, and tournaments.