Dust 2 Callouts in CS2: Complete Map Guide
Everyone knows Dust 2. Even if someone has never even launched CS2, they’ve almost certainly seen this map: the sand, Mid, and those iconic double doors. For many, it’s the first map they ever played in Counter-Strike and the one where they’ve spent the most rounds. It seems so straightforward that most players are convinced they know it inside out. But in practice, that’s not always the case.
Most of the time, everything falls apart because of bad info. Saying “one at A” tells your team almost nothing. Is he at Goose? On Ramp? Behind Car? A few seconds of confusion, and the round is already lost. That’s why solid Dust 2 callouts make all the difference. In this guide, we’ve put together all the essential position names so you can give clear info, and your team knows exactly what’s happening.

In article you will find:
Overview of Dust 2 (Map Background & Layout)
Looking at the competitive map pool, Dust 2 remains a top pick among pro players. Created by Dave Johnston, it’s considered the “gold standard” for tactical shooters. Having survived every iteration of the game, it remains a masterpiece of balance.
Visually, the map takes us to the Middle East. In CS2, the developers significantly upgraded the lighting and textures, making the environment much brighter and more vibrant, though thankfully, the core geometry remains untouched. It’s still the same arena featuring three distinct lanes of attack:
- Long A: A massive alleyway designed for sniper duels and full-scale executes.
- Mid: The map’s “backbone” – controlling this area provides access to both bomb sites.
- B Tunnels: Tight, enclosed spaces where shotguns and SMGs reign supreme.
The defining feature of Dust 2 is its openness. With so many long sightlines, the AWP is the undisputed king here. It’s also a map of quick rotations. Defenders can reposition in seconds, so it’s critical for attackers to call out info instantly using the correct Dust 2 map callouts before the enemy can anchor their position.
How to Use Callouts — Best Practices
Before you start memorizing names, you need to know how to use them effectively. In the heat of battle, with utility popping everywhere, nobody wants to hear a story. Your info must be short, clear, and relevant.
Follow the golden rule of comms: Location + Number + HP (if known). Instead of yelling, “Oh my god, they’re all over there, help!”, it’s much more effective to say: “3 Long, one low.” This gives your team a clear plan: your sniper can focus on Long while the A anchor prepares a Molotov.
Also, keep an eye on your radar – it’s a game-changer. Often, you can call out an enemy spotted by a teammate who’s too busy in a firefight to speak. This kind of synergy is how you rank up fast and climb the CS2 ranking system. Remember: a silent teammate is a team’s worst enemy.
Dust 2 Callouts by Region
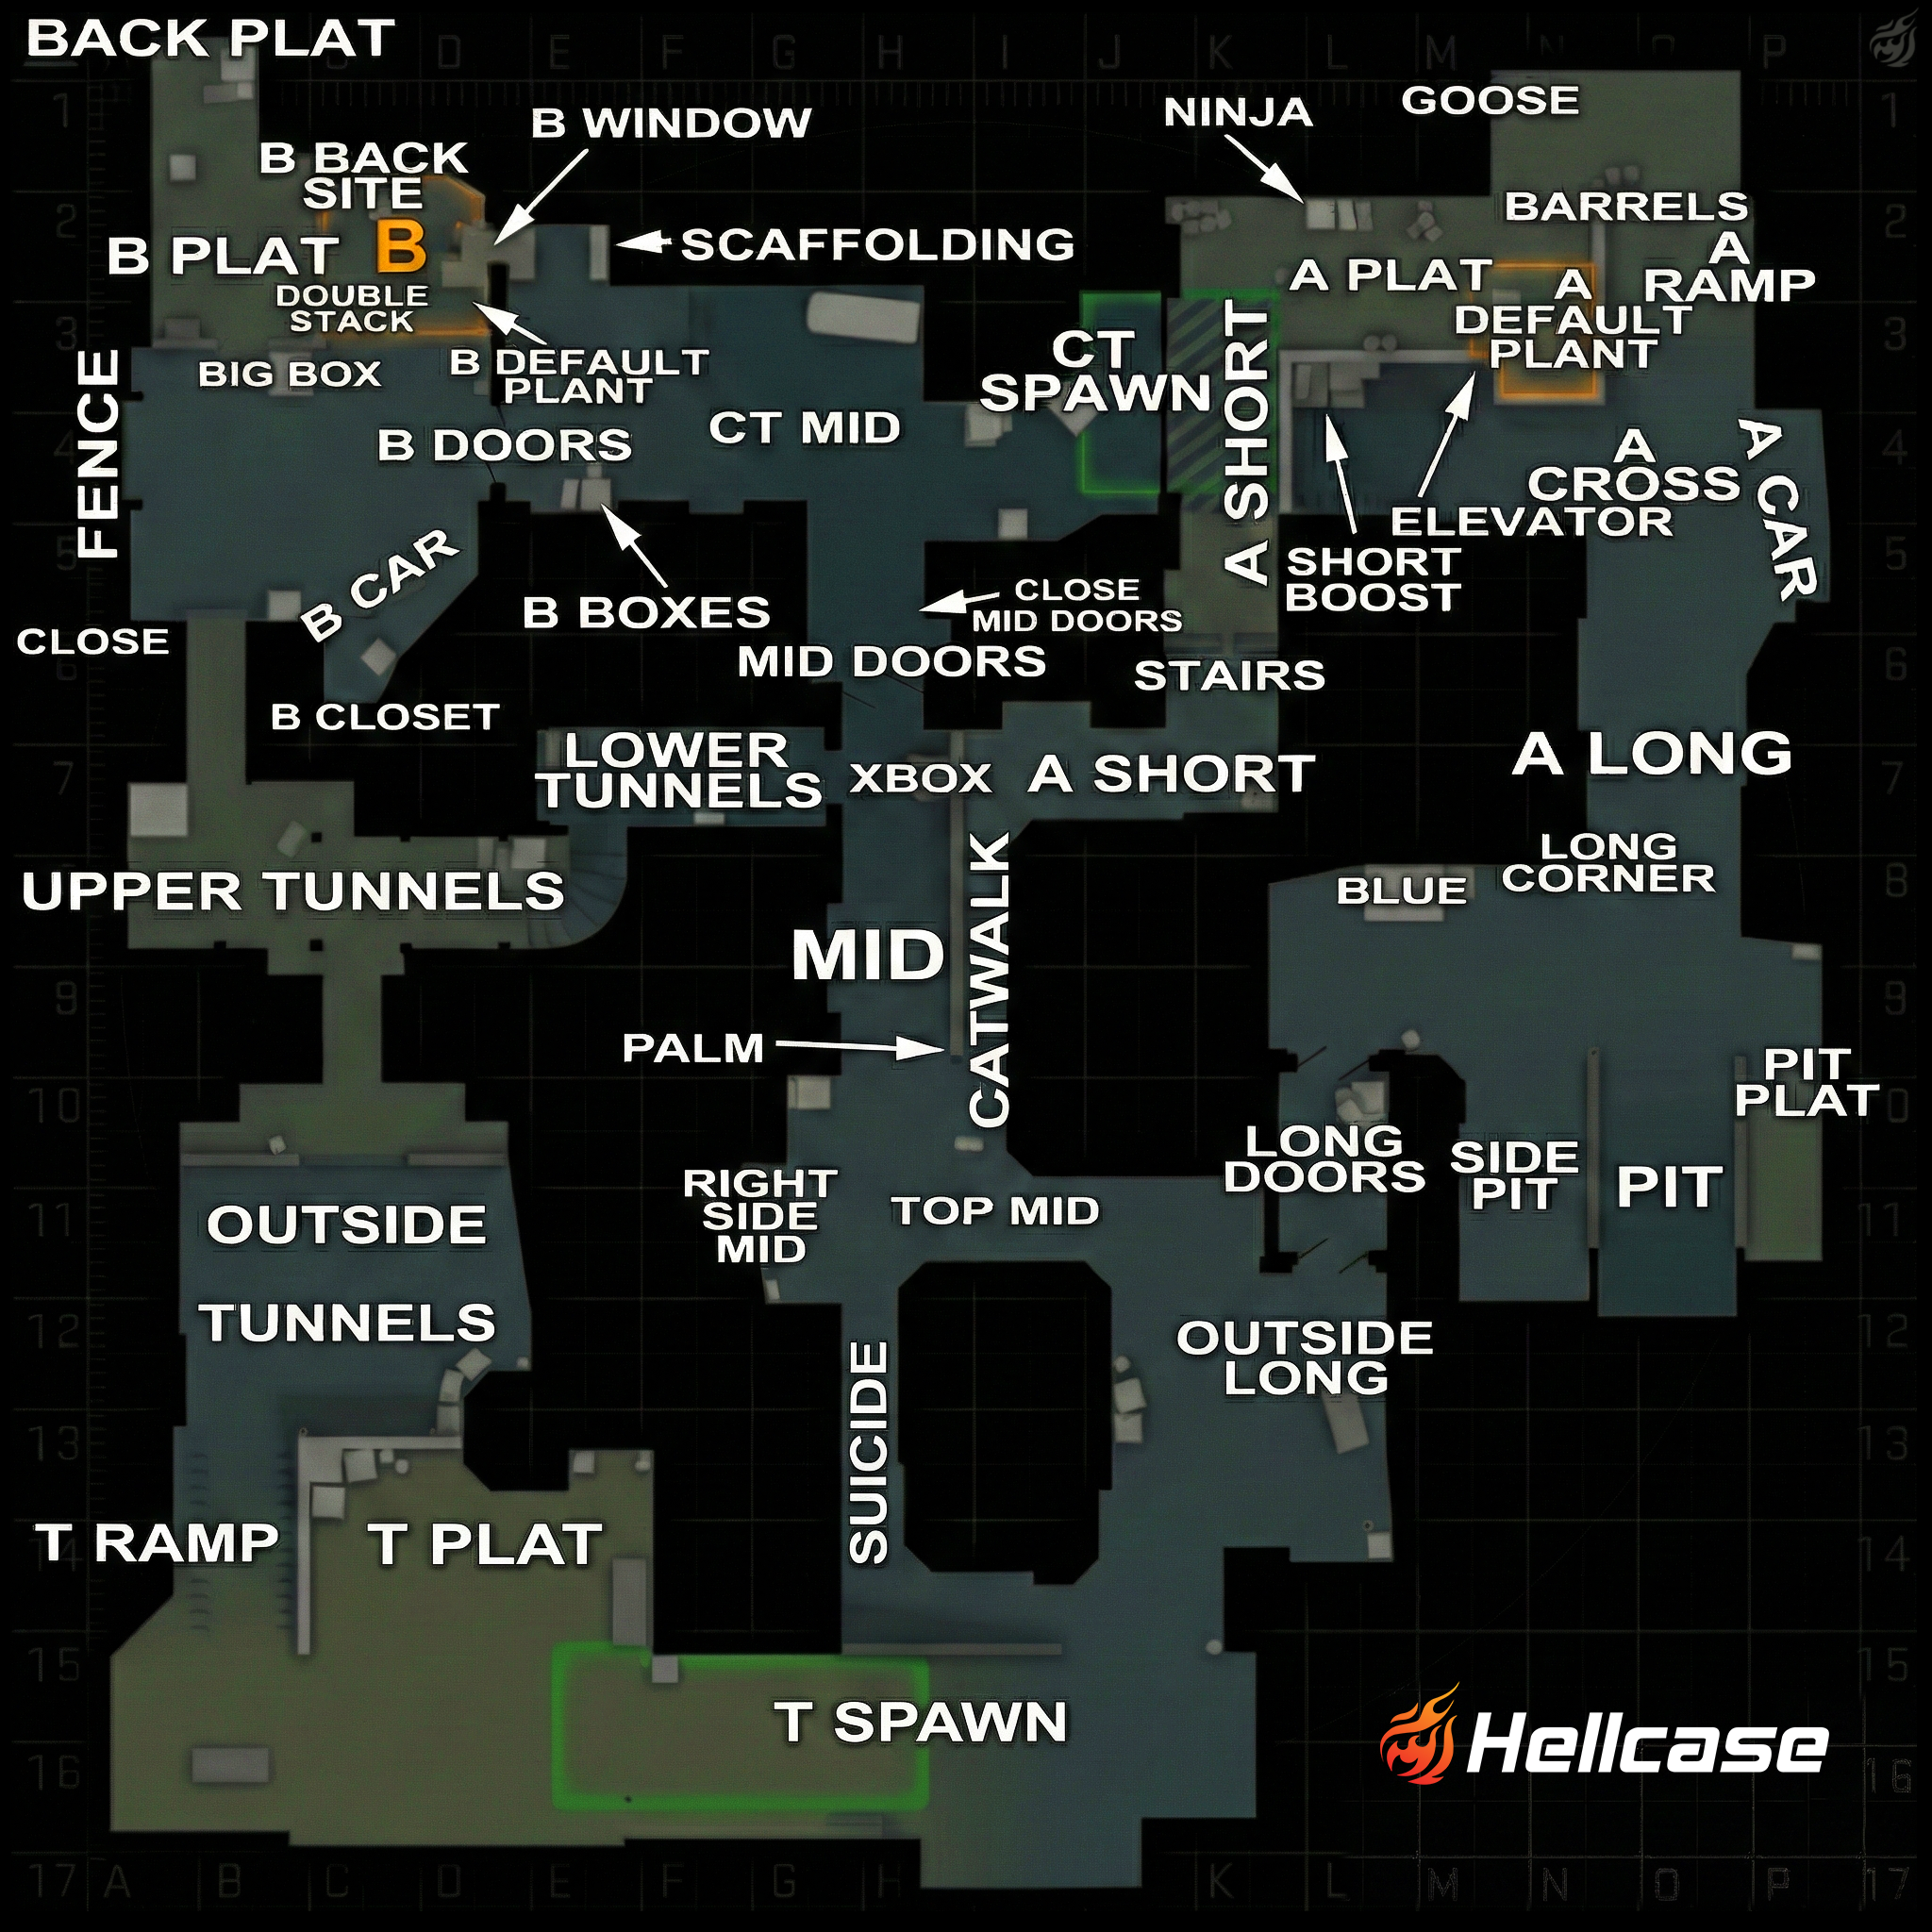
The map is fairly compact but packed with specific spots. To keep things simple, we’ll divide it into logical zones: A Site (and its approaches), B Site (and Tunnels), and Mid/Spawns. Let’s start with the place where the most intense sniper duels happen – A Site.
Callouts for Dust 2 A Site
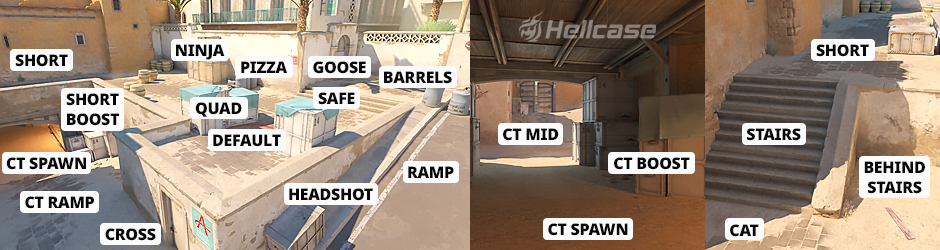
A Site is unique because it can be hit from two completely different angles: “Short” (the path from Mid) and “Long” (the direct alley). If you lose Mid control, CTs can also rotate through CT Spawn. This creates numerous angles to clear for both sides.
Being precise matters. Here are the main Dust 2 callouts for A:
- Long (Long A): The main alleyway leading from T-side to the site. Controlling Long often dictates the flow of the round.
- Pit: The large dip at the end of Long. It’s a defender’s nightmare – a player in Pit only shows their head, making them incredibly difficult to frag.
- Blue (Blue Box): The blue container at the exit of Long. A common piece of cover to dodge Pit snipers.
- Side Pit: The area next to the Pit (near the doors). Often used for off-angle plays on Long.
- Car: The vehicle (or what’s left of it in CS2) on the right side of Long. A classic AWP spot, but be careful – it’s easily wallbangable.
- Cross: The open area between Long and the Site. Without a smoke, crossing here is usually suicide.
- Ramp (A Ramp): The slope leading from Cross onto the platform. AWPers often hold this to shut down Long pushes.
- Default / Site: The main crates where the bomb is usually planted. Planting “for Long” is the meta, allowing players in Pit to guard the bomb.
- Goose: The back corner of the site. Named after the goose graffiti – a tribute to Gooseman, the co-creator of Counter-Strike.
- Ninja: A hiding spot to the left of the Ramp (from the T perspective). Perfect for letting enemies pass and then going for a ninja defuse or a backstab.
- Elevator: The corner below the platform near CT Spawn. Named after the “boost” tactic where teammates would lift someone back onto the site. Now, it’s a key defensive anchor spot.
- Boost: The crates on the site directly under Short. They allow players to jump up to Catwalk or hold an angle on Zig-Zag.
- Catwalk: The narrow bridge leading from Mid to Short.
- Short (A Short): The final stretch from Mid to A, ending at the stairs near the site.
- Stairs: The steps connecting Short and A site.
As you can see, the A Site is a space where raw reaction time and long-range precision take center stage. But Dust 2 wouldn’t be Dust 2 without the legendary “Rush B.” So, let’s step out of the bright sun and move into more close-quarters areas to break down the Dust 2 callouts CS2 for the B Site.
Callouts for Dust 2 B Site
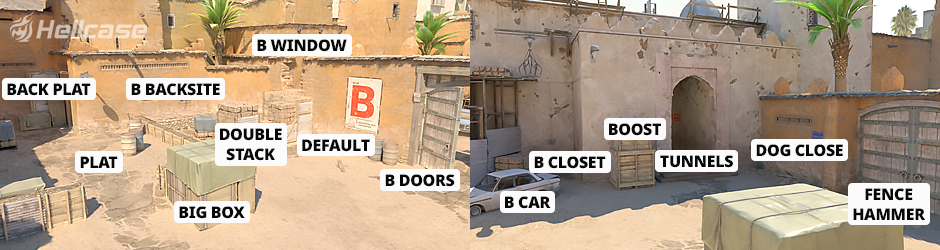
B Site is the polar opposite of A. It’s a claustrophobic fortress with a narrow choke point (Tunnels) that’s easily shut down with utility. However, if the Ts manage to break in, retaking B is a literal hell for the CTs.
Key positions for B Site:
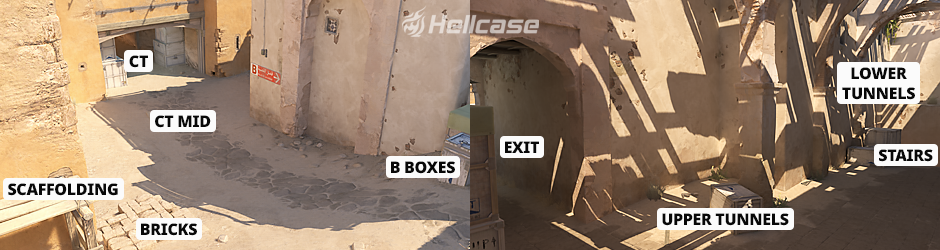
- Upper Tunnels (Upper Tuns): The main T-side entrance to B. A dark, dangerous choke point that’s constantly targeted by incendiaries.
- Lower Tunnels (Lower Tuns): The path connecting Tunnels to Mid. A vital artery for rotations or flanking Mid defenders.
- B Doors: The double doors leading from Mid to B. The primary route for a CT retake.
- Window: The opening in the wall near the doors. A crucial spot for CT snipers or for throwing retake utility.
- Car: The pile of scrap on the right side of the Tunnel exit. A popular “one-and-done” spot for defenders.
- Closet: The deep corner to the right of the Tunnel exit. A favorite spot for campers – always check this corner.
- Close (Close Left/Right): The immediate corners outside the Tunnel exit. Common spots for shotgun players on eco rounds.
- Big Box: The large container on the site. Often used as cover for planting “for Tunnels.”
- Default: The standard plant spot (usually next to Big Box), visible from Tunnels.
- Platform (Plat): The raised area where the bomb site is located.
- Back Plat (Back Site): The rear area of the platform behind the crates. The safest spot to hide from an execute or to save a weapon.
- Fence / Wall: The wall along Back Plat where defenders often “head-glitch” to watch Tunnels.
So, those are the key positions for holding and attacking this ‘fortress.’ The B site demands nerves of steel and the ability to fight in tight spaces. But controlling the game requires more than just knowing the bombsites. It’s time to step out into the open and break down the Mid callouts – the area that ties the whole map together and where the round is often decided.
Mid Callouts
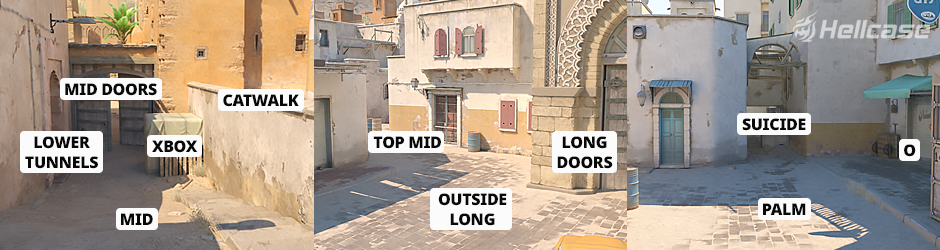
If Long is for duels and B is a meat grinder, then Mid is pure chess. Controlling the center unlocks access to every part of the map. But watch out: it’s the most dangerous zone, where you can catch a bullet in the very first seconds of the round.
Here are the main positions along the central line:
- T-Spawn: The Terrorist base. The push toward Mid starts here.
- Suicide: The pit/drop right after leaving T Spawn toward Mid. The name speaks for itself: if you jump down here without cover against an enemy sniper, you’re dead.
- Outside Long: The area just outside the “Long” doors. Terrorists often group up here before executing a push.
- Top Mid: The upper section of Mid held by Terrorists. It offers a view of the doors and the window.
- Palm: A spot at Top Mid near the palm tree (on the right if you’re looking at CT).
- Xbox: The large box in the center of Mid. This is a key object: players smoke it to cross safely to Short or jump on it to cut travel time.
- Lower Tunnels (Lower Dark): The tunnel entrance from the Mid side. Often used for tricky maneuvers and flanking.
- Mid Doors: The legendary double doors. They’re wooden (wallbangable!), and T snipers try to pick off CTs crossing to the B site through the gap.
- CT Spawn (CT Mid): The area behind the doors where CTs spawn. It’s the main hub for rotating between A and B sites.
We’ve covered the center, but there are a few specific Dust 2 callouts that didn’t fit into the main categories yet are must-knows.
Other Important Dust 2 Callouts
Beyond the bomb sites and Mid, there are areas you’ll run through hundreds of times. Knowing their names will help you coordinate rotations and weapon saves much better.
- T Spawn: The Terrorist base. A large open area. If you hear “Save T Spawn,” it means enemies are likely hiding there to save their guns for the next round.
- T Ramp: The slope leading from T Spawn toward Mid and B. Attack snipers often stand here at the start of the round, trying to pick someone crossing the doors at Mid.
- Outside Tunnels: The area outside the Upper Tunnels entrance on the T side. Attackers often gather here before a B rush.
- Scaffolding: The construction structure near the Window and B Doors on the CT Spawn side. It’s a vital defense spot for boosting into Window or holding the doors from above.
- Close Mid: The corner to the right of Mid Doors (from the CT perspective). CTs often hold here to catch attackers pushing through the doors off-guard.
Callout Usage in Game Scenarios
Knowing the CS2 Dust 2 callouts is only half the battle. The main thing is stringing them into sentences quickly to give your teammate a full picture of the fight – transforming them into useful intel. Let’s look at concrete examples where proper Dust 2 callouts save the round.
For example, you’re attacking A, running up Long with the Ts. You successfully smoke “Cross,” but bang, three of you go down. From where? Ninja? Goose? Default? Giving precise info during a push is incredibly important, so your allies know where to expect the enemy.
By calling out that the opponent is holding “Ninja,” you can throw a Molotov there without even going up the Ramp, securing the kill without losing another teammate.
Common Mistakes, Ambiguous Callouts & Conflicts
Even veterans get confused sometimes, leading to funny (or tragic) situations. Here is where problems arise most often:
- Short A vs Catwalk: Technically, “Catwalk” is the narrow walkway from Xbox to the stairs, while “Short” is the area near the stairs and the A site. However, 90% of players just call the whole path “Short.” If you say “Cat,” people will understand, but “Short” is more universal.
- Car (A) vs Car (B): There are two “Cars” on the map. One is at Long (A), the other outside the Tunnels (B). Always specify “Car Long” or “Car B,” otherwise your teammate might turn the wrong way.
- Palm vs Face/Barrels: There used to be barrels on A Site; now they are grain sacks, yet some people still scream “Barrels.” The same goes for “Palm” at Mid – the palm tree has been gone for ages (replaced by a telephone pole back in CS:GO), but old-school players still use the name out of habit.
- Suicide vs T-Spawn: Don’t confuse these concepts. “Suicide” is the pit at the bottom. If you call “Sniper T-Spawn,” your teammate might think the sniper is up top and jump safely into the pit – where they’ll get killed instantly.
Try not to mix up CS2 Dust 2 callouts, as it’s truly crucial. It’s also important to do what we mentioned earlier – give precise intel. If you have info on an opponent, don’t stay silent. Tell your allies briefly and clearly. If you know the enemy is low on health, mention that too – something like “Short low” or similar.
To Sum Up
As you can see, Dust 2 is a map where history is written in every round. It looks simple but hides immense tactical depth. Knowing exact callouts turns the chaos of random plays into a clear, structured game. You won’t be guessing where the enemy is – you’ll know for sure.
Don’t try to memorize every nook and cranny in one night. Start with the main zones (Long, Short, B Tunnels), and over time, your vocabulary will expand to a pro level. And if you feel like the desert landscapes are getting stale and you want something new, be sure to check out our Anubis callouts guide to dominate the sands of Egypt just as confidently.
FAQ
In general, most names remain the same since the map layout hasn’t changed. However, visual changes (like the removal of skyboxes or changing car models to sacks/crates) can affect the description of some minor positions.
Mostly yes, as English callouts are the global standard. However, different regions might have their own slang variations (like “Goose” having local nicknames in the CIS community or specific terms for Brazilian players).
Officially, the map is inspired by Morocco and the general aesthetic of the Middle East. In CS2, the developers added more architectural details typical of old cities in this region, though a specific real-world prototype doesn’t exist.
Historically, Dust 2 was considered T-sided due to Mid control and the ability to isolate the B site. However, in modern CS2, with new smokes and economic changes, the balance is constantly shifting, making it one of the fairest maps for both sides.
Radosław Davidović is Hellcase’s customer success manager. He enjoys blogging to share his knowledge and experience with customers.