Train Callouts in CS2: Complete Guide to Map Positions & Communication
Train has returned to CS2 but has undergone a major update, forcing even experienced players to relearn the map. New passages, redesigned angles, and reworked positions make every decision crucial. If you want to feel confident in rounds and avoid getting lost at key moments, knowing the precise callouts will be your greatest advantage. Let’s break down the map step by step, and you’ll be playing Train with much greater confidence.
In article you will find:
Overview of Train (Map Background & Layout)
The updated Train in CS2 retains its recognizable character, but the map’s internal geography has changed so much that familiar routes now feel completely different. The disappearance of the vertical entrance to the old Pop-Dog and the addition of an elongated passage dubbed Underpass have noticeably altered the pace of attacks on the lower levels. Another significant transformation has affected the point above A-Bombsite: the former high-altitude position has given way to a new ground level, changing the perception of long-range duels. Changes have also affected the width of key corridors. Some have become more spacious, while others have shrunk, forcing a rethink of familiar routes to gain control. The repositioned and relocated trains on both sites further enhance this picture, creating new lines of fire and cover options.

All of this creates a different tactical landscape: the map requires a fresh perspective and careful exploration before it begins to reveal its potential.
How to Use Callouts — Best Practices
Effective callouts on Train rely on a calm and clear delivery. Panic only disrupts the team, so conveying information must be confident and without unnecessary emotion. It’s important to stick to specific zone names: vague phrases like “he’s there” or “near the car” create confusion, while a precise landmark immediately sets the direction of action. Besides the location itself, it’s helpful to communicate key details, including the number of opponents, their estimated health, the grenade they used, or any noticeable weapon. This helps the team better assess the situation and choose a response.
Avoid overloading with repetitions or comments that aren’t relevant to the current situation. Information quickly becomes outdated, so it makes sense to communicate only what’s relevant at the moment. Another important principle is to use modern zone names that correspond to the CS2 version: Train’s changes affected many landmarks, and reverting to older terms can lead to misunderstandings. Coherent communication based on these rules makes team actions much more precise. Understanding the map and making clear callouts gives a significant advantage in matches where every detail affects the outcome, especially given how the CS2 ranking system works.
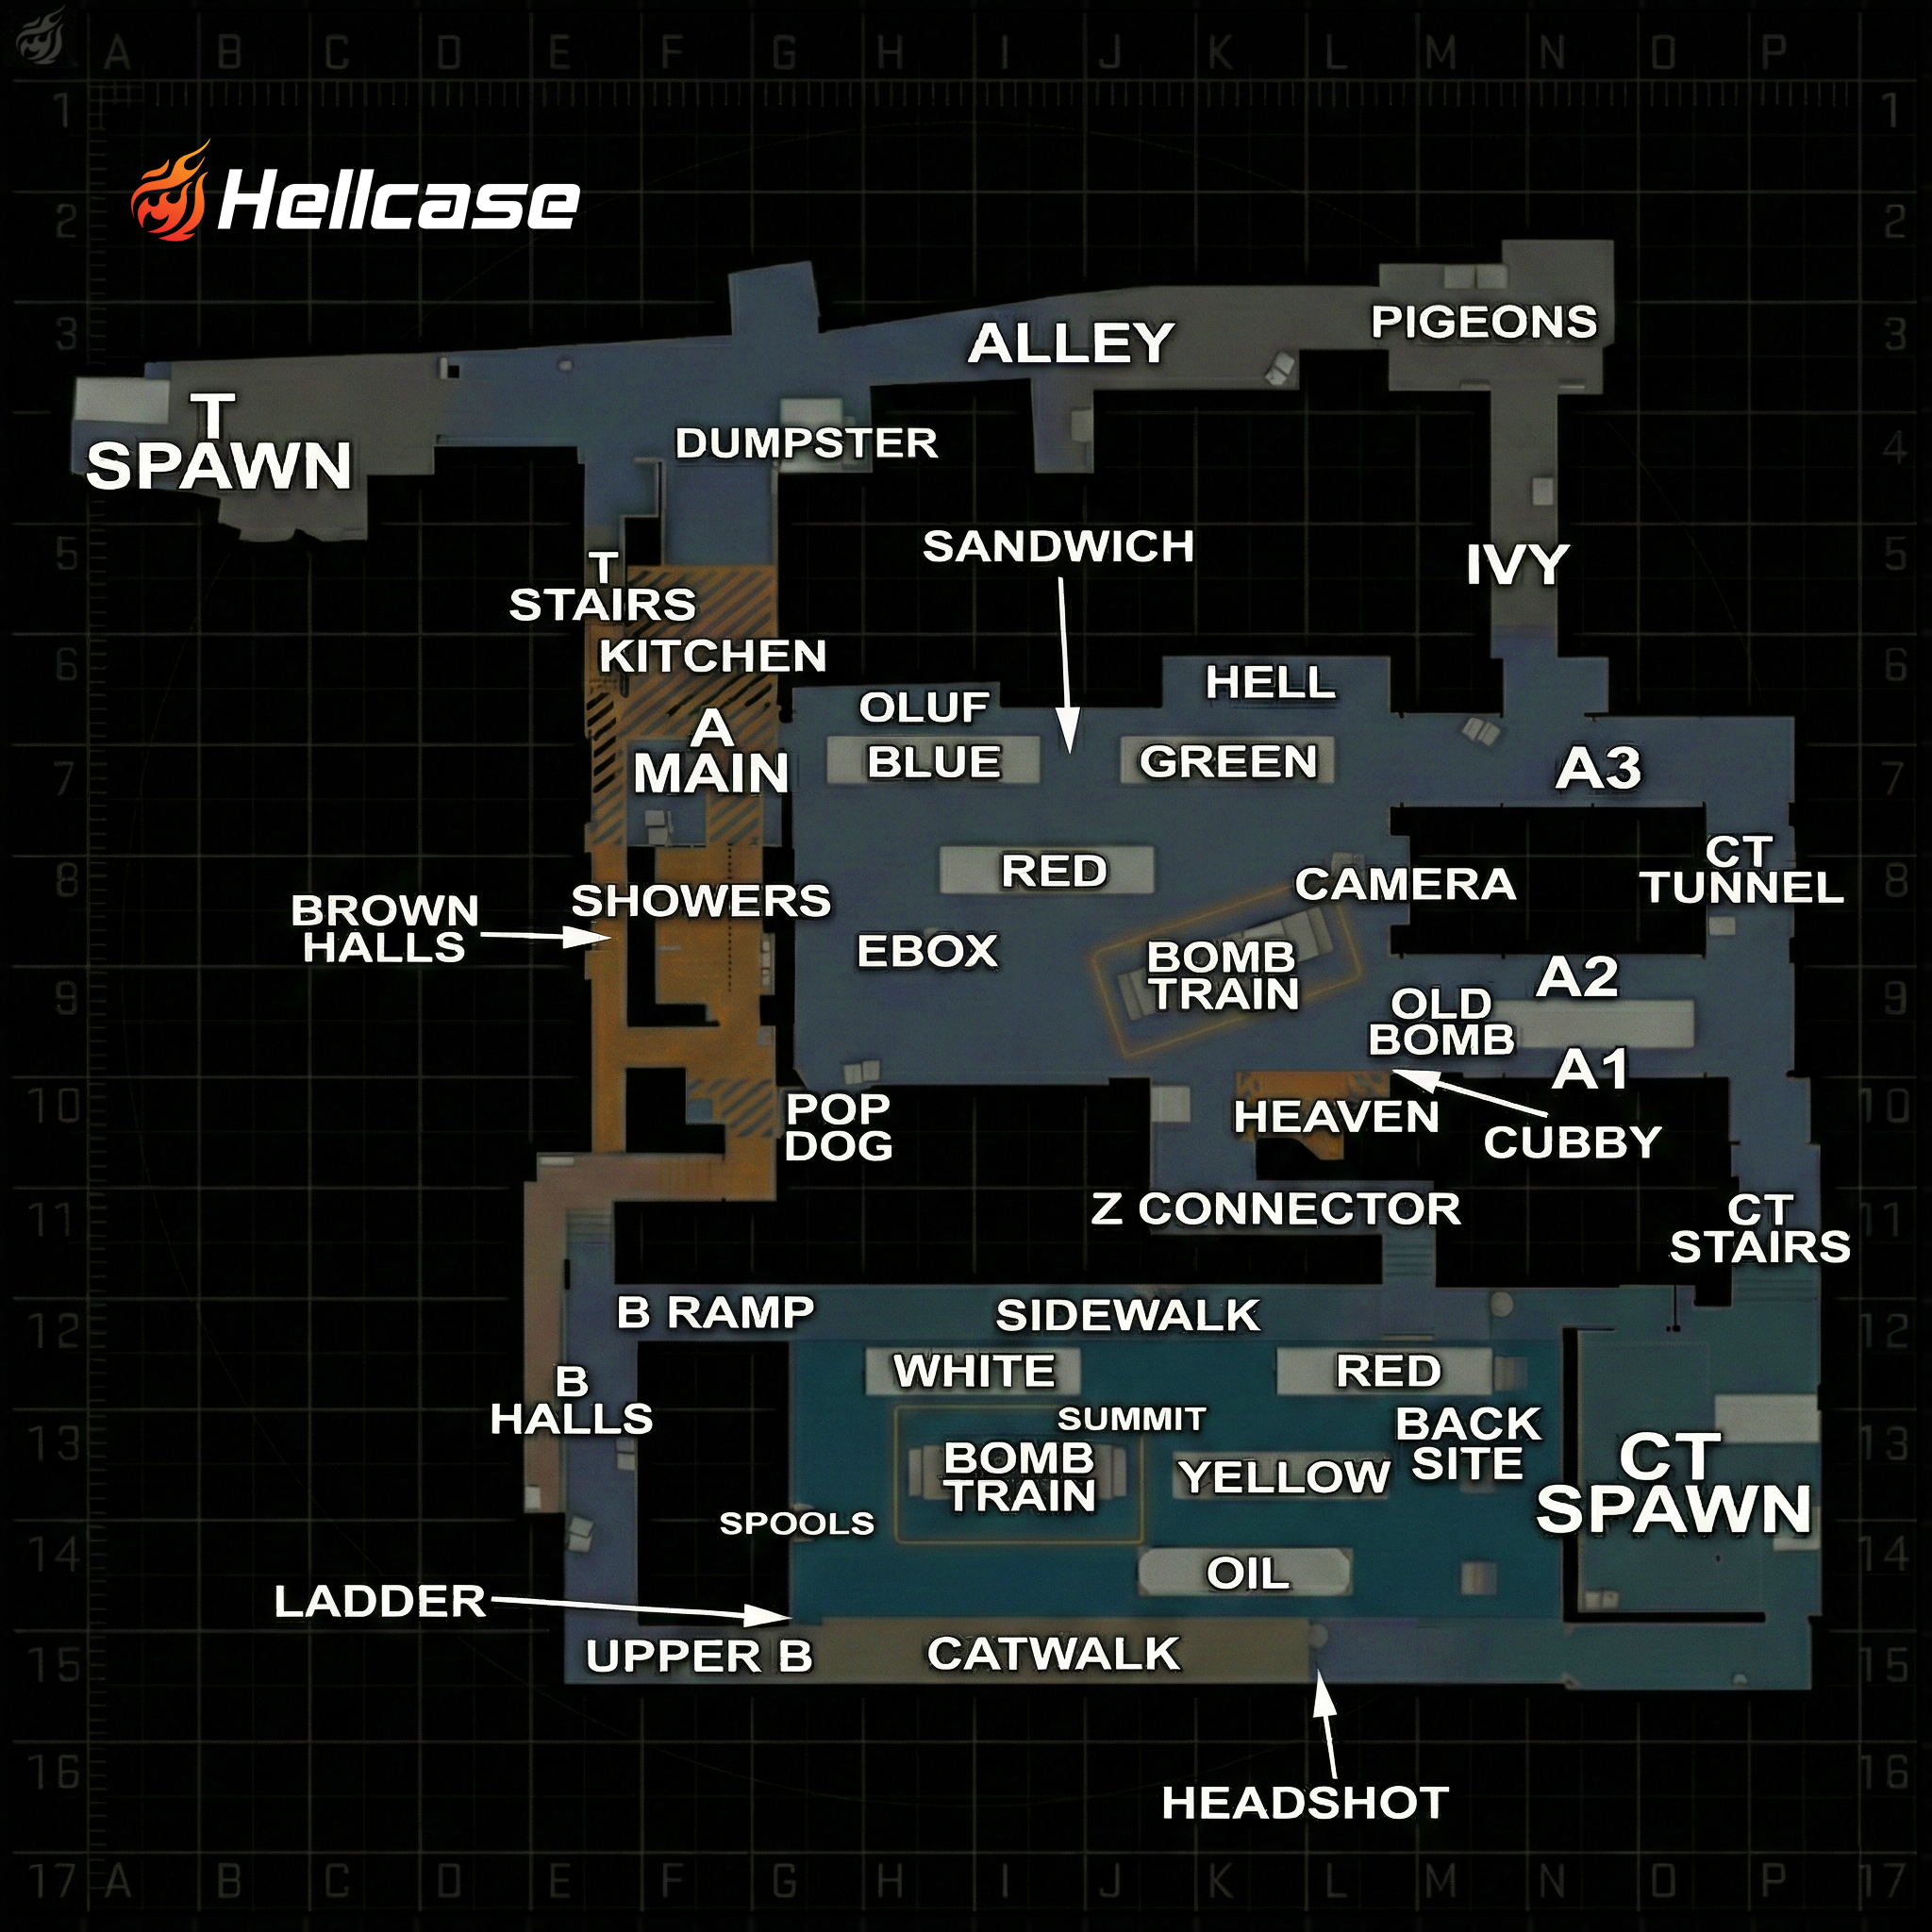
Train Callouts by Region
The Train map in CS2 is divided into several large zones, each setting its own pace for the round. The A-side converges on the A Main exit, the passages between the cars, and positions from which to secure the approaches. The B-site is formed around Ramp, Upper B, and the line of trains, directing both quick exits and counter rotations. The outer routes (Ivy, Alley, Pigeon, and Underpass) give teams opportunities for flanking, hidden passages, and unexpected attack angles.
The map structure is designed so that each zone is connected to the next by several routes, so a precise knowledge of callouts helps with quicker navigation and more effective team coordination. The following sections will examine key zones in more detail.
Callouts for Train A Site
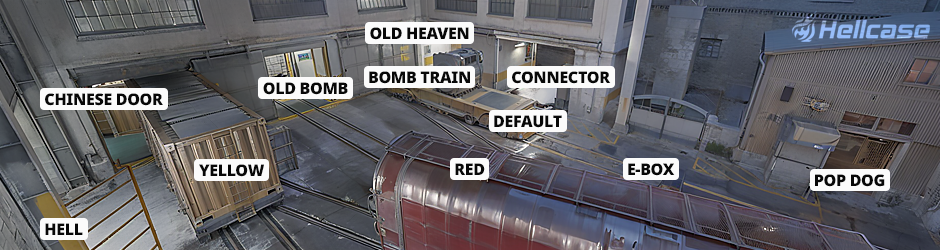
Train’s A-Site in CS2 is built around several points that determine the tempo of the round. The main entrance through A Main remains the key attack channel: this is where initial contact most often occurs. Nearby is Olof, a small elevated area with a convenient line of sight. A little further away is E-box, a landmark used both for holding and redirecting pressure.
As players advance across the site, they pass along Yellow and A Red cars, around which most firefights are centered. These trains divide the space and form the main movement lines. Hell remains on the left, a partially enclosed point allowing control of A2 and adjacent routes.
A-Site in CS2 has become more open, increasing the importance of precise Train callouts: the number of directions requiring attention has increased. Corridors A1 and A2 play a key role in the new structure. A1 connects the site to the CT direction, while A2 connects to Ivy and the CT Tunnel. For attack, proper distribution along these routes reduces the risk of being pinned down; In defense, this gives the opportunity to move faster and not lose control of important angles.
Callouts for Train B Site
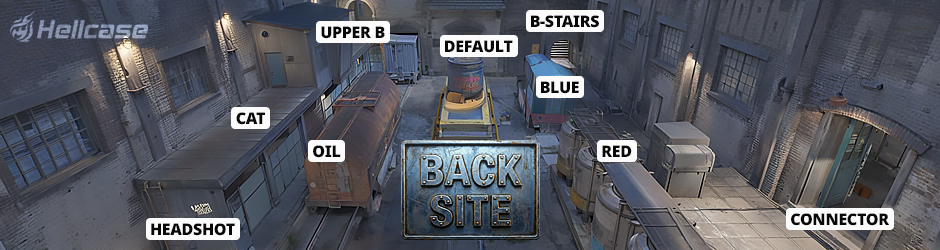
On B-Site, the dynamic is different. B Halls lead to two main directions—Upper B and B Ramp. Upper B offers vision over most of the site, while B Ramp is used for a tight exit. Nearby, B Ladder creates an additional route for changing direction.
On the site itself, Blue, B Red, and Orange trains form distinctive sightlines. They help the defense maintain depth and the attack advance between cover. The central point, B-Site, is surrounded by these trains. Behind it is Back Site, an expanded area that speeds up rotations but increases the number of angles from which danger can come.
CS2 Train Mid, Ivy, and Rotations
The central and lateral directions of the map determine the overall architecture of the round. T Spawn and CT Spawn are positioned so that both sides have quick access to key routes. On the T side, the exit through T Stairs opens up access to Kitchen, Showers, and Underpass. This creates several player distribution options and allows for different attack tempos.
CT Stairs connect the defense to A1, allowing the defenders to reinforce A-Site in a short period of time. Ivy remains the main lateral direction: this corridor connects Pigeon, Alley, and A2, forming a route through which flanking attacks frequently occur. Pigeon acts as a buffer zone in front of Ivy, where teams often wait for the right moment to advance. Alley, leading to this area from T Spawn, allows the attackers to combine slow builds with unexpected movements.
The Connector remains the key node here: it links both platforms and allows the defense to change direction without giving up ground. Thanks to several parallel routes, the central part of the map feels less like a separate zone and more like a network of pathways that sets the overall tempo of the round. This structure directly influences how players use Train callouts and communicate across the map.
Other Important Train Callouts
In addition to key areas, Train has several smaller but important landmarks. Near A-Site is Old Heaven, a convenient spot for playing deep. The Showers and Kitchen positions offer good vantage points and grenade preparation.
At the bottom of the map are Headshot and Catwalk. Headshot has a low line of sight, forcing attackers to find alternative approaches. Catwalk allows for silent movement along B-Site. These landmarks complement the callout system, improving communication.
Callout Usage in Game Scenarios
In fact, it’s the callouts that determine how a team reacts to the development of the round. On the B-site, information from Upper B or Ramp quickly indicates the attack direction. On the A-site, messages from A Main or A2 help set up positions in advance and prepare for pressure.
Callouts reflect the current state of the battle. If a player notices an opponent transitioning from Hell to Yellow, a timely callout gives the team the opportunity to regroup before the engagement begins. This transforms disparate points into a unified system that the team manages in concert. To fully master the game, it’s important to understand not only Train’s landmarks but also other maps: by studying, for example, Anubis callouts, a player will more quickly develop a general understanding of the structure of battles and improve their reading of game situations.
Common Mistakes, Ambiguous Callouts & Conflicts
Errors in callouts are most often related to the use of outdated names. The transition from Pop-Dog to Underpass and the disappearance of the former Heaven require a re-accustoming process, and incorrect terminology can lead to a loss of control.
Another problem is the confusion of closely located zones. On the A-site, players may confuse Hell with the areas leading to A2 if the information is communicated too quickly. On the B-site, similar confusion is possible between Blue and B Red, which are located nearby.
Another common mistake is broadcast congestion. Duplicate or overlapping messages hinder the team’s ability to respond promptly. Clearly defined roles and consistent position names remove unnecessary noise in voice chat: everyone knows their responsibilities and understands each callout. When this is paired with the ability to adjust your playstyle to different parts of Train, it becomes easier to keep the pace of the match, stay focused, and rank up fast, relying not only on sharp aim but also on a strong understanding of the map.
To Sum Up
Working with Train callouts in CS2 begins with understanding the map structure and the role of each zone in the development of the round. The more accurately players communicate information, the easier it is for the team to maintain control, organize rotations, and avoid tactical errors. Coordinated callouts affect not only the tempo but also the quality of team decisions, especially during tense moments of the match. If you want to continue understanding the maps, mechanics, and strategy of CS2, check out our other blog posts for even more helpful analysis.
FAQ
In CS2, a number of locations on Train received new names due to the map redesign. Pop-Dog is now called Underpass, and the former Heaven has disappeared, making way for the ground-level Old Heaven. Some passages have widened or changed shape, so some landmarks have shifted, but the basic callout system remains recognizable.
Most players adhere to generally accepted callouts, especially those used in tournaments and professional settings. However, within teams, slight variations or simplified names may be encountered.
In the updated version of Train, the map’s design is based on an industrial theme, but its connection to the real city is not emphasized. The main focus is on futuristic freight trains and redesigned industrial zones, rather than a direct geographical prototype.
Despite the updated geometry in CS2, the Train map still favors defense thanks to its structure—closed paths, distant points, and quick reinforcement routes for defenders. However, the attacker now has more tactical options. The outcome of each round is determined by the depth of map understanding and the precision of execution.
Radosław Davidović is Hellcase’s customer success manager. He enjoys blogging to share his knowledge and experience with customers.