How To Transfer CS:GO Config to CS2 Seamlessly – Full Guide
With the recent release of CS2, the gaming community is abuzz with excitement. If you’re looking to dive right into the action with your personalized settings, this guide is for you. Learn how to effortlessly transfer your CS:GO config file to CS2 and hit the ground running.
This comprehensive Hellcase guide provides a step-by-step process to migrate your CS:GO config file to CS2, ensuring a smooth transition to the new game. Keep this guide handy and make the most of your CS2 experience from day one!
In article you will find:
What is a CS2 Config File?
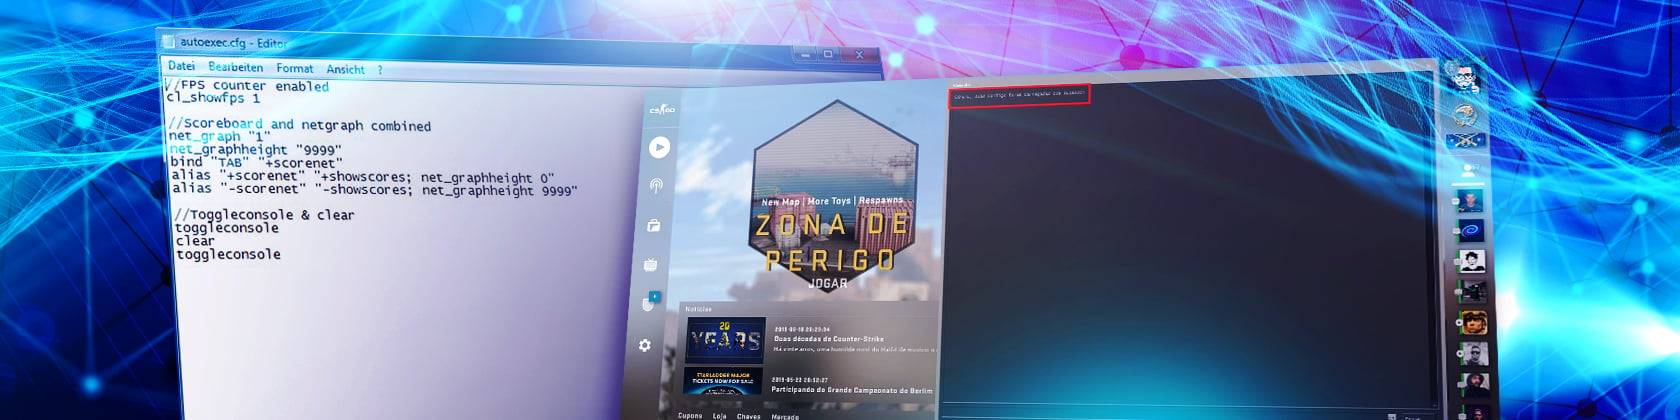
A CS2 config file is a virtual text document placed in a specific location within the game’s files. The config automatically executes the specific console commands it contains every time your game runs. CS2 config allows your game to operate with your personal settings, ensuring consistency no matter where you play.

How to Create a CS2 Config?
Creating a CS2 config is a pretty straightforward process. Essentially, it is a text file containing various console commands. While the game is still in beta, some commands might change, but having a CS2 config file ensures your main settings remain intact.
Creating a CS2 config involves the following steps:
- Start with a text file that contains various console commands tailored to your preferences.
- Save this file with a .cfg extension.
- Place this file in the appropriate CS2 directory (usually within the game’s installation folder under a ‘cfg’ directory).
- Launch CS2 and execute the CS2 config file using the game’s console.
Launch CS2 and execute the CS2 config file using the game’s console.
Need help with the commands? Check out our CS2 config commands guide.
How to Transfer a CS:GO Config to CS2?
Transferring your config file to CS2 is not just about convenience. It’s about preserving the time you’ve spent fine-tuning your settings in CS:GO.
By migrating your CS:GO config, you ensure that your gameplay experience in CS2 remains consistent with what you’re used to, allowing you to focus on enjoying the new gameplay without the hassle of readjusting your settings.
Let’s begin our walkthrough of how to transfer your config, from figuring out CS:GO config location to activating it in CS2.
Locate Your CS:GO Config File
If you don’t have your CS:GO config file saved in a particular folder on your computer, you can still find it in the Steam folder. Here’s how to do it.
- Navigate to your Steam folder, usually located in ‘Local Disk (C:)’.
- Proceed to ‘Program Files (x86)’ -> ‘Steam’ -> ‘userdata’ -> YOURSTEAMID -> ‘730’ -> ‘local’ -> ‘cfg’.
- Locate and copy your CS:GO config file.
Once you’re done with these steps and have copied the file from the CS:GO config location, you can continue transferring your CS:GO config to CS2.
Find the CS2 Config Directory
The next step is to find the CS2 config directory on your PC, which is the same process as in the previous stage.
- Go to your Steam folder.
- Navigate to ‘Program Files (x86)’ -> ‘Steam’ -> ‘steamapps’ -> ‘common’ -> ‘Counter-Strike Global Offensive’ -> ‘game’ -> ‘csgo’ -> ‘cfg’.
- Paste your copied CS:GO config file here.
You’re almost there! Before launching your CS2 config, ensure you eliminate any movement issues if there are any.
Solve Movement Issues in CS2
After transferring your CS:GO config to CS2, some binds may fail due to different code commands in CS2. Create a new config file. For example, name it fix_movement.cfg, and include specific binds to fix these issues.
Activate Your CS:GO Config in CS2
So, you have copied your CS:GO config to CS2 config directory and are ready to launch the freshly released game with your personalized settings. Here are the three steps you need to take to do that:
- Launch CS2 and open the developer console.
- If the console does not open when you press “~”, enable it in game settings.
- Type exec myconfig.cfg to launch your CS:GO config.
- Type exec fix_movement.cfg to launch the bind-patch config.
That’s it! You are ready to conquer Counter-Strike 2 servers and well-prepared to dive into the game with all your personalized settings intact. Happy gaming!
Conclusion
By following these steps, your CS:GO config will be successfully transferred to CS2, ensuring your settings from CS:GO will work in CS2. Remember to check all the necessary binds again before playing to ensure everything works as expected.
Explore Hellcase Blog for more interesting articles about CS2 skins and other cosmetic items, in-depth game guides, and esports news. Stay tuned, gamer!
FAQ
Transferring your CS:GO config to CS2 ensures you maintain the gameplay experience you’re accustomed to. By migrating your personalized settings, you can dive into CS2 without the need to reconfigure controls, key bindings, and other preferences. This saves time and allows you to focus on enjoying the new features and maps in CS2.
While many settings in CS:GO might be compatible with CS2, there are bound to be new features, commands, and settings exclusive to CS2. Using the same config file without modifications might lead to unexpected behaviors or errors. Making the necessary adjustments to ensure full compatibility with CS2 is recommended.
To locate the CS:GO config files:
-Navigate to your Steam folder, typically found in ‘Local Disk (C:)’.
-Proceed to ‘Program Files (x86)’ -> ‘Steam’ -> ‘userdata’ -> YOURSTEAMID (a folder named with numbers corresponding to your Steam ID) -> ‘730’ -> ‘local’ -> ‘cfg’.
-Here, you’ll find your CS:GO config file.
Remember, always keep a backup of your original config files before making any changes or transfers. This ensures that you can revert to your previous settings if needed.
A CS2 config is a file placed within the game’s directory that contains personalized settings and commands. This file is automatically executed every time the game runs, ensuring that your game operates with your preferred settings. It’s especially useful for players who switch between different machines, ensuring a consistent gameplay experience.
Creating a CS2 config involves the following steps:
-Start with a text file that contains various console commands tailored to your preferences.
-Save this file with a .cfg extension.
-Place this file in the appropriate CS2 directory (usually within the game’s installation folder under a ‘cfg’ directory).
-Launch CS2 and execute the config file using the game’s console.
Average CS enjoyer. Knows everything about CS skins, including which ones will suit your weapons best.